This article was written by Dave Cross.
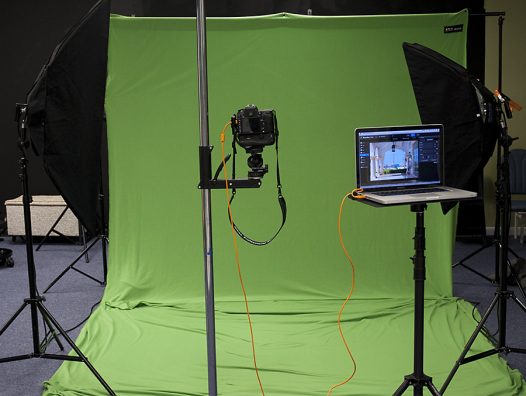
Needless to say, photo booths continue to be extremely popular, and thanks to a simple green screen setup you can quickly and easily create photos with unlimited backgrounds. In this typical example, I have a Westcott Green Screen Backdrop on a background stand with two Spiderlites. Of course you could use any lighting setup, but I prefer constant lights for a couple of reasons: it allows for quick shots without any delays waiting for a flash, and there’s no bright pop of flash to “interrupt” the event.

My camera is tethered to my laptop that’s sitting on an Tether Tools Aero MacBook 15″ table. Although I didn’t use it for this sample setup, I always add on the SecureStrap for an added bit of security and peace of mind. Although I would have someone manning the photo booth at all times, I am still concerned about the safety of my equipment, so I use the JerkStopper Tethering Kit, securing the tethering cable to my camera and to the laptop.

As an added security bonus, people seem to notice the USB 2.0 High-Visibility Orange TetherPro Tethering Cable much more than when I used to have a standard black USB cable. For tethering software I use either Lightroom or Sofortbild.


I use PhotoKey Pro software (from FXhome) for its green screen prowess, in particular a key function called Use Hot Folder.

I designate a “watched” folder that my images are put into from my tethering software. Ahead of time in PhotoKey I import a background image and add an overlay (e.g. name of the event). As soon as a .jpeg is captured, it’s automatically extracted, put on the background, and is ready to print. It’s actually surprisingly fast – so fast that it’s almost done printing by the time the customer is walking over to see the result.


Photo booths are an interesting source of added income for many photographers, so why not take it up a notch by offering your client the option of choosing any background they want? With a simple tethered set up that’s been described here – and PhotoKey software – you can make it happen quite easily.
The Ultimate Photo Booth Setup
From Tether Tools

If you would like to provide the option of printing on-site, the Tether Table Aero Master Table is the perfect size to accommodate a small printer and computer. All you need is a stand for that table and you have a complete workstation in a small area.


