

Bio:Evan Guttman is the owner of EvanWasHere Photography, based in NYC. Evan’s work is internationally published, with this photos gracing the covers of 8 magazines in the last year alone. Connect with Evan online at www.EvanWasHerePhotography.com or connect on Instagram @EvanWasHere.
Armed with a Sony a7RII, Profoto lights, a TetherPro USB cable and AeroTab Universal Tablet Mounting System tethered to a Surface Pro tablet, photographer Evan Guttman hit the streets of NYC from Times Square to an upscale rooftop lounge. Check out his How I Got the Shot writeup below!
It started as a simple idea. I shoot with the Sony a7RII and Profoto had finally come out with their Sony adapter to control their lights. I purchased a set of Profoto B1s a week after the adapter was officially out. The plan, I told myself, was to just do a quick test shoot so I could see what these lights were made of. This did not end up working out that simple.
First, I called my friends at APM Models https://www.apmmodels.com/ who graciously offered me two amazing models, Elliana (who I’ve worked with before) and Lacey. I then called two more colleagues I knew, for hair and makeup and they signed on before I had even finished speaking. Then I decided I probably could use a stylist and another colleague was on board. Cinematographers, signed. Assistants, no problem. I then figured I could use a male model to balance this out, so I called One Management https://www.onemanagement.com and they were signed on. I then realized I needed a location, so I called the owner of Lovage https://www.LovageNYC.com, a new rooftop lounge opening in midtown Manhattan, and he granted me the space. Finally, I realized that this was a production and it needed to be showcased somewhere to show off everyone’s hard work, so I called the publisher of Indulge Magazine https://indulgememagazine.com/ , and got the shoot featured in a 9-page spread.
Did I mention I did this all in one day? It was amazing the people you could bring together who have the same passion and drive you have to make art. I had the crew, I had the location, I just needed to make sure I had the equipment. I’m a big believer of rentals, so I stopped by CSI Rentals https://www.csirentals.com and FotoCare https://www.fotocare.com to pick up anything I was missing. While getting everything, I also picked up the Tether Tools AeroTab for my Surface Pro, a Tether Tools USB cable, and the Tether Tools JerkStopper Camera Support. I had been excited about using these products for a while, so I figured now was a good time as any to go for it. The one thing I did not get, regretfully, was the Tether Tools Rock Solid Master Articulating Arm kit. Instead, I grabbed a generic arm and clamp figuring it would be good enough. That didn’t go as planned either as you will find out in a bit.
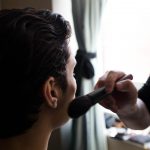
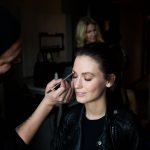
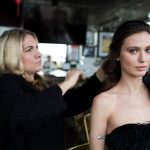
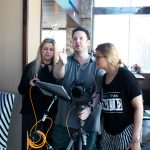
The day arrived for the shoot and I had the models, hair and makeup, and BTS photographer come in early at 8:30am. We had a lot of stuff to shoot that day, so I needed everyone ready as soon as possible. Since Lovage is on the rooftop of a hotel, we were graciously given a suite for prepping in.
Once I saw that everyone was in motion, I made my way to the lounge, where I discovered a little issue. You see, Lovage was a brand-new location in NYC. So new, that they were literally opening that week. So, as I was setting up my equipment, their staff were putting the final touches on the lounge. But they did an amazing job, and by the time I took my first shot, everything was ready.
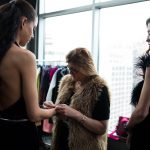
The stylist arrived at this time, bringing the most amazing array of clothes, shoes, and accessories. We had enough for the models to wear for a week.

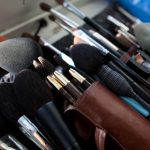
Setting up equipment is a lot of work. I had to cleans the sensors on the cameras, clean the lenses, setup the gimbal, build the softboxes, put together the tripod, add the arm, get my Microsoft Surface Pro and Capture One ready, build the slider, test the sound, etc. All while answering questions from the crew, such as, what the first shot will be, what outfits the models will wear, how the models will be positioned, and most importantly where we we’re ordering for lunch. You always need to feed your crew!

We were finally approaching the time for our first shot. I always try and go for a difficult shot first, as it gives me time to play with the lighting, gauge the mood and reactions of the models, and test my gear. A couch in front of mirrors seemed like the best way to start this. I then had to direct where my lighting would be, my assistant’s responsibilities for this shot, the poses I wanted the models to achieve, etc. My process involved taking some sample shots and having the models come look on my tablet screen, so they could understand what I was asking from them, as well as figure out the best way to give that to me.
It was now 11:30am and we were finally ready to go. I decided to put the two Profoto B1 lights, slightly to the left and right of the models. I needed to make sure I could light up the models, without getting the light reflected off the mirror, but at the same time, not causing too much shadow on the couch behind the subject. While focusing on all that, I also had to shoot diagonally from the models so I didn’t see myself or my crew in the mirror. Then an (almost) disaster happened. The generic arm I had attached to the tripod which held the AeroTab which held my Surface… failed! The arm swung down to a 180-degree position, taking the tablet with it. The whole room gasped. I nearly had a heart attack. My Surface was literally swinging by the floor and tripod legs, within inches of hitting both. The shoot hadn’t even begun, and I almost lost one of my most important tools. Luckily, there was no damage. I repositioned the arm to a degree it was more comfortable in, albeit very shaky, and made sure to watch it closely for the rest of the shoot.

I used the Sony 24-70mm GM lens on the camera. Since both models were far apart from each other, I wanted to use a higher aperture so they were both in focus. Because this darkens the shot, I set my lights to 3/4 power, while giving it a little boost in ISO.

When you shoot, especially for a magazine, you never know if you will need to be shooting a shot for a 2-page spread or a single page. When you shoot a spread, that means you need to keep in mind that there will be a gap in between the pages (where the staples go), so you need to make sure that no important content is located there (such as the model’s faces). But sometimes a magazine will want a 1 pager, which means you need to get all the content in a portrait for a single page. For this reason, we repeated the shot, this time having the models right next to each other.

For the next scene, I wanted to showcase the beautiful rooftop deck. Since it was still February, the lounge didn’t have their full summer couches out yet, so I needed something to accessorize the shot. I picked up the piano (with the help of the lounge owner and an assistant) and carried that puppy outside.
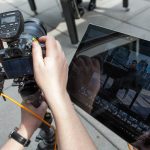
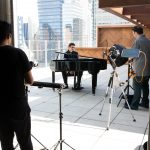
For this shot, I tried doing a side lighting shot, but the glass wall was reflecting the lights too much, so I just used a single Profoto for the model’s face. As I took the shots, I had instant gratification of how the shot looked due to shooting tethered to the Capture One running on my tablet. I would take the first shot, then create adjustments such as removing highlight, adding contrast, adjusting brightness, etc. These adjustments would then automatically sync to the next shots, so I had an almost WYSIWYG (What You See Is What You Get) environment. Because I was monitoring the tablet screen as I shot, I noticed details that you ordinarily would miss using just the camera to review shots. In this case, I saw how the model’s head was distortedly half reflected in the top of the piano. It was not a pleasant look. So, we put the top of the piano down and retook the shots.

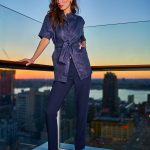
Next, we were at the bar. For this scene, the stylist chose really bright colors for the model’s outfits. This looked amazing against the golden backsplash of the bar.

I placed the lights diagonally from the models on their left and right. This lit up their location beautifully, reflecting the bright colors. The only issue this caused was a slight shadow on half their faces that were not lit by the lighting, but I knew this could be easily corrected in Photoshop. We also compensated a bit by placing a reflector underneath one of the lights to try and reduce any hard shadows. I pumped up the ISO a bit to make sure the back of the bar was lit, while shoot at a higher aperture to keep both models in focus.

As I set up for the next shot, I performed one of those most important tasks I had for the day… feeding the crew!
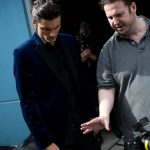
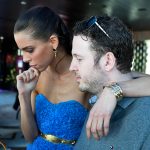
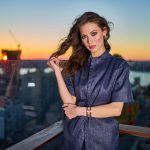
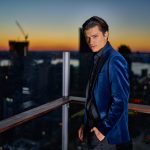
While my guys ate, I set up for the shot. One thing a photographer tries to do during a shoot, is minimize the waste of time. So, while I shoot one model, the other models are getting ready at makeup/hair/style. This means that while others can take breaks, you can’t. Luckily Michael, my male model had eaten before the others and he was ready to shoot with me. Since my behind-the-scenes photographer was eating with the rest of the crew, this scene does not have a lot of BTS shots. But my cinematographer was still shooting, so please see the video of this shoot if you would like to see more.
Again, I place my lights diagonally to the left and right of the model. My plan was to brightly light up this really colorful chair and model, while muting the backdrop. This is where the fact that my Surface was literally at my fingertips made all the difference. Because I was shooting tethered, I could adjust the lighting in real time to confirm that the settings I was using worked. Since I wanted to blur the background, I changed lenses to the Sony 35mm Distagon, which offered me an aperture of f/1.4. Because this allows a lot of light into my camera, I utilized HSS (High Speed Sync) in my Profotos when I changed to a shutter speed of 1/2000th.

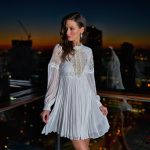
For the final scene inside, I wanted to incorporate these beautiful white and fuzzy looking chandeliers. I had done a walk-through of the space the day before and this was what caught my eyes the most. It also allowed me to get a half inside/half outside shot.
Of course, when you have an entire crew behind you, everyone has an idea for how the models should pose. My way of appeasing everyone is to calmly say that we can try their poses but to let me try my poses first, just to get them for a comparison we can then go over on the Surface screen. This way I get what I want, but also have the option to try out their way as well, because it never hurts to try something different. It makes everyone feel like they have a voice in the shoot, collaborating and creating art with me. Plus, sometimes someone can have an even better vision than I am having. As before, I shot in a high aperture to keep everyone in focus, helping the reduction of light by stepping up the ISO, moving back to the 24-70 lens as well.

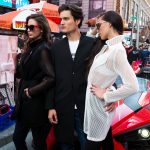
The last shot was finished at 4pm. We had plans for a shoot at sunset, which was about 5:30 p.m. that day. This gave us about an hour to run to Times Square to do a shot I had planned the day before. I had located a sidewalk in the middle of Times Square that had a bit less of the tourists than the rest of the area had. Since Lovage was about three blocks from this spot, I figured we would have enough time to add this scene to the shoot. My vision was for the girls to wear something sexy, while still keeping themselves covered. I had told this to my stylist and she had found this amazing mesh overcoats that the models could wear lingerie underneath, which kept them covered, yet gave a hint of sexiness through the mesh.
Since we wanted to rush, we split up a bit, with a few walking over while I broke my equipment down, a few people riding in the publisher’s car, and then myself and the rest of the crew taking a taxi. When we got there, I started to set up to get the equipment ready. What I didn’t know, was the publisher had driven past a team of people driving these 3 wheeled Polaris Slingshots. She felt that this would add to the scene of the shot. The next thing I knew, I had these cars pull up and the lead car asking for me. And then … it was chaos! We had tourists line up the sidewalks to the left, to the right, in front of us, behind, even walking in between us. The low-key scene I had planned, getting in and out, was gone. Traffic was stopping around us as tourists stopped traffic to look at the models with these different looking cars in front of us. I was not ready to shoot at that moment as I was still getting the equipment ready, plus the models now no longer felt comfortable not wearing pants while surrounded by hundreds of people taking pics and video from a few feet away from them.
But as a photographer, you need to roll with the punches. Keeping my Surface on the AeroTab, I attached it via it’s threaded screw plate to a shoulder sling strap I had my assistant wear. This kept her from accidently dropping the tablet while tourists shouldered their way past us to take a photo. Because of the Tether Tools bright fluorescent USB, everyone saw the cable and stepped over it. I also had the JerkStopper ready on my camera in case someone did. I assigned another assistant on the crew to watch my bags which had $20,000 in gear in them. Using only one Profoto light, I placed it on a boom pole, so another in my crew can hold it. I had my assistant with my Surface stand right next to me so I could constantly monitor the way my photos were looking. I knew NYPD would be there at any minute to make us all move, so the less tripods and stands on the ground the better.


Less than 5 minutes later, the police showed up and made everyone move. I quickly packed up my gear, but told my crew to wait on the sidewalk for about 5-10 minutes. Sure enough, the crowd dispersed and the scene got quiet. But, because we were surrounded by buildings and the sun was now setting, the area was much darker than when we first got there.

I couldn’t really get the original shots I wanted as the scene behind the models was too dark, plus we had to rush back to the rooftop to get the sunset. But we did get some amazing photos, so you can see a bit of my original vision.


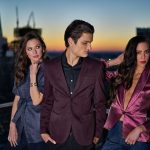
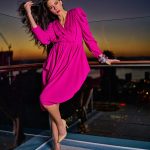
We then ran back to catch the sunset on Lovage’s rooftop. I needed to expedite getting my gear ready, the models needed to change and get their makeup and hair right, all while the sun started slowly dipping down the horizon. But we made it and I started shooting!

This is the part where I admit I made a mistake. It’s not something I enjoy doing, but I want to be honest with everyone. I. made. a. mistake. When I was changing the battery in the camera, I accidently changed the ISO. As a general rule, when I am shooting, I don’t like to go over 1,200 ISO. After 1,200, a higher ISO can introduce noise, and while the Sony a7RII is a beast of a camera and can probably handle higher, it’s not something I like to test out especially in a magazine spread. Though, if I was shooting with the A7SII, I could probably hit 2,500 before I even noticed a hint of noise. But on my camera, I had accidently changed the ISO to 6,400. Not realizing this, and seeing my picture was very night, but thinking it was because the sun was shining directly into the lens, I compensated by raising the shutter speed and the aperture. But, honestly the resulting photo, still looks amazing.

I then changed lenses to my Sony 35mm Distagon and realized my error. I quickly fixed the ISO issue and then rebalanced my other settings. As it got darker and darker, I quickly finished my shoots with the following amazing pics.
It was dark and the shoot was finally over! I called it a wrap and then got some drinks with the crew at the lounge, which had just opened for business.
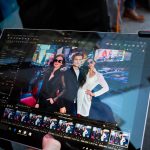
The new few days, I worked with the magazine publisher on which shots she loved from the shoot. Using Capture One, we rated the shots, organizing them quickly. I also met with the stylist who had her own set of shots she wanted. Finally, I could start editing them myself.
For light and color, I start in Capture One, which works well with Sony RAW files. Once I have them where I want it, I export the pictures in TIF Adobe RGB format. Adobe RGB is important as the printing press will be able to utilize all the extra colors. Because of this, I edit everything with a 4K 32” 100% Adobe RGB LCD that is attached to my MS Surface Book.
Once my files are exported, I open each TIF one by one in Photoshop. My process is to eliminate any objects, dirt, etc. that I don’t like in the shot first. I also use Adobe Camera Raw to straighten the shot. I then use frequency separation to clean the skin. Then I add local contrast enhancement using the amazing NEXT plugin https://www.knowhowtransfer.com/photoshop-professional-plugins/next-local-contrast-enhancer/ . Finally, I add sharpness to the shot. The shots are then uploaded to the cloud and I start planning my next shoot.
Note: After this shoot, I purchased the Tether Tool Rock Solid Master Articulating Arm and Clamp Kit plus an Aero Elbow. The failure of an arm has not been repeating on the 3 shoots I have used this on and I feel much more comfortable with my Surface connected to my tripod.
I hope you enjoyed reading how I create, execute, and finalize my shoots. Remember, this is just my methodology. There are millions of others. Just because I may do it this way, and you may do it another, does not mean anything as long as you are happy with the results. Creating art isn’t about a certain process. For me, it’s about creating beautiful results. I hope I helped you on your journey of making beautiful things.
Gear used on this shoot:
- Sony a7RII https://amzn.to/2oayiUJ
- Sony 24-70 GM lens https://amzn.to/2nLBItu
- Sony 35mm Distagon https://amzn.to/2p9UETO
- Tether Tools AeroTab https://tethertools.com/plugging-in/aerotab/
- Tether Tools USB cable https://tethertools.com/product/tetherpro-usb-2-0-a-male-to-micro-b-5-pin/
- Tether Tools Jerkstopper https://tethertools.com/product/jerkstopper-camera-support-copy/
- MS Surface Pro 4 with i7, 16GB ram, and 512GB SSD https://amzn.to/2ogWoh0
- MS Surface Book with i7, 16GB ram, and 512GB SSD https://amzn.to/2ogOlAQ
- Capture One Pro 10 https://www.phaseone.com/en/Products/Software/Capture-One-Pro/
- Sony a7SII (for video) https://amzn.to/2oav03L
- Sony a6300 (for 1 minute of video) https://amzn.to/2oJHMrd
- Rode VideoMicro (for video) https://amzn.to/2ogPuZc
- Ikan Beholder MS-Pro (for video) https://amzn.to/2oasCdq
- Focus F-1 Quick Rapid Shoulder Sling Belt Neck Strap https://amzn.to/2oR5Aq1
- Carson Camera Sensor Magnifier – 4.5 x 30mm https://amzn.to/2oR4c6H
- Giottos AA1900 Rocket Air Blaster Large https://amzn.to/2nLHPhz
- Profoto B1 Location Kit with TTL-S Air Remote for Sony https://amzn.to/2nme3Ew
- Profoto OCF Octo Softbox 2’ https://amzn.to/2oJGZ9R
- Profoto OCF Softbox 2×3’ https://amzn.to/2nLNKD5
- Photoflex LiteReach Plus boom pole https://amzn.to/2nT4idj
- Ravelli APGL4 tripod https://amzn.to/2nSJbrw
- Yuri Arcurs Custom Brackets https://www.custombrackets.com/products/steadypod-series.html
- Dozens of batteries
Lovage Shoot:
- Photographer, Creative Director, Retoucher: Evan Guttman http:\\www.instagram.com\EvanWasHere
- Model: Michael Dittrich http:\\www.instagram.com\mekelison
- Model: Elliana Gran http:\\www.instagram.com\ellianagran
- Model: Lacey Bollinger http:\\www.instagram.com\laceybollinger
- Makeup: Oscar Caballero http:\\www.instagram.com\oscarmakeup
- Hair: Emily Carcaramo http:\\www.instagram.com\hairbyemilynyc
- Fashion Director, Fashion Stylist: : Engie Hassan http:\\www.instagram.com\EngieStyle
- Cinematographer: Luis Ramirez http:\\www.instagram.com\LuisRamirez
- Cinematographer: Talia Vaughn http:\\www.instagram.com\Tia_carta
- BTS Photography: Kensey Jean http:\\www.instagram.com\KenseyJean
- Assistant: Elizabeth Dotsenko http:\\www.instagram.com\lizxks
- Location: Lovage Rooftop 350 West 40th St., New York, NY http:\\www.instagram.com\lovagenyc

To download this, and 11 more How I Got the Shot guides, download version 2 of the How I Got the Shot Guide at TetherTools.com. Each educational article features a different image, behind-the-scenes video, as well as a detailed breakdown of how the shot was made.