
Edited by Anders Espersen
Photography is often times a collaborative effort with groups of people coming together to supply their input on wardrobe, lighting, makeup, hair, prop styling, and overall creative direction of the project. In doing so, it’s essential to easily share the digital images being created with groups of people across the country or even across the room. The easier that this can be done, the better.
With today’s technology we are able to instantly see the images we are capturing on a computer screen just seconds after we take them through tethered capture. Furthermore we are also able to quickly and effortlessly share these images with other mobile devices through a shared network. This can be beneficial for, let’s say, photographers light painting a scene on-location needing to remotely fire a camera while holding a light, or even for a group of creatives working on-set with a photographer in a client area with a couple of iPads. Whatever the case may be, this collaborative possibility can only be made possible through existing Wi-Fi or Ad Hoc networks.
Ad Hoc networks refers to the ability of devices being able to communicate directly with one another without the presence of Internet. It’s essentially everything a Wi-Fi network has minus your ability to access the Internet through a browser. Ad-Hoc networks can be invaluable in remote locations without power, abandoned buildings, or locations where you do not have the necessary credentials to join an existing Wi-Fi network. Creating Ad-Hoc networks is also affordable as practically all newer model Apple laptops come with the ability to create a network for file sharing on-location.
Let’s say that I am working with a team of people shooting architecture on-location and a Wi-Fi network has not been setup yet but there is power in the building. By creating an Ad Hoc network through my laptop and/or portable wireless router, I could take advantage of software programs like Capture Pilot to use iPads to quickly and easily share photos with my team despite the absence of an existing internet connection.
The following two sections will explain how to create an Ad Hoc network on a compatible Apple laptop using OS X or Network Preferences with or without the presence of a routing device like an Apple Airport Express.
Ad Hoc Networks encompass many different aspects of technology, many of which go beyond the scope of this guide, which will focus on:
- What an Ad Hoc Network is
- Benefits and Limitations of Ad Hoc Networks
- Creating an Ad Hoc Network using OS X
- Creating an Ad Hoc Network using an Apple Airport Express
- Disconnecting an Ad Hoc Network
- Where to go if you need help
What is an Ad Hoc Network?
In short, an Ad Hoc network is a temporary wireless network created using a computer’s built-in (or sometimes external) wireless network adapter, essentially making it function as a temporary wireless router that can wirelessly connect devices together in a situation where a conventional wireless network that boasts proper wireless infrastructure (e.g. Wi-Fi) is unavailable or inaccessible.
Benefits and Limitations of Ad Hoc Networks
Ad Hoc networks allow you to share resources on your computer, such as files (documents, pictures, videos), and even internet connection wirelessly to other Wi-Fi capable devices without using an existing Wi-Fi network.
As previously mentioned, an Ad Hoc Network can be useful in for wireless tethering when Wi-Fi is unavailable or inaccessible or where there’s no power and you have to run the network off batteries. Ad Hoc Networks also give you greater control over which devices can access the information you’re sharing.
However, Ad Hoc Networks are not known for their sustainability as a long-term wireless solution namely because they are being hosted from a computer’s wireless network adapter, which is not specifically designed for this purpose. The wireless network adapter in your computer is meant to act as a wireless communications medium between your computer and a wireless access point such as the wireless router you may have at home. For this reason, Ad Hoc Networks are not as robust as other wireless networks.
With the most recent Mac OS X update to 10.10 Yosemite, Apple has chosen to completely omit security when setting up an Ad Hoc network. This is due to their termination of the long-outdated WEP security protocol. This means that if you a sharing confidential information you should pland for another option than setting up an Ad Hoc Network as described below.
There are two different approaches you can use to build an Ad Hoc Network using an Apple computer: using OS X and using an Airport Express. The Airport Express adds expense but offers a more secure, reliable and configurable network connection
Creating an Ad Hoc Network using OS X
In this section I will provide a set-by-step visual guide of how to configure an Ad Hoc Network with Mac OS X using the Create Network command.
Using the Create Network command to set up an Ad Hoc Network
Step 1. Navigating the Wi-Fi Drop-Down Menu
The first step towards creating your Ad-Hoc Network using the Create Network command will be to find this icon, known as the Wi-Fi icon, and click it to present the drop-down menu. You can find the icon in the top right corner of your desktop:

Clicking this icon will present you with options to connect to different wireless networks within your area and will look much similar to this: 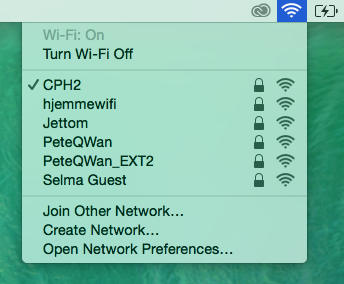
There may be many different networks to choose from as shown here or there may be none. Every time you click this icon you may be presented with a new set of networks. If you no networks appear, there is no reason to be alarmed. This just means there are no wireless networks around you, which will not impact your ability to create an Ad Hoc Network.
Regardless of how long or short the list of networks, look towards the bottom of the menu where you’ll find “Create Network…” listed second from the bottom of the list.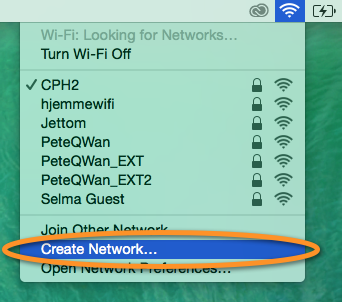
Once you click the Create Network… command, a dialog box giving you the option to create a computer-to-computer network should appear: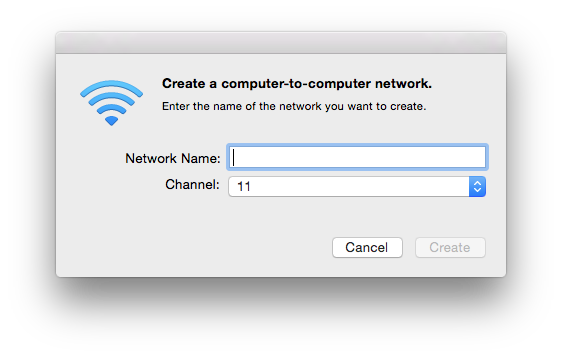
Step 2: Using the Create a Computer-to-Computer Network dialog box
The first thing you’ll need to do is name your network. We’ve used “Ad Hoc Network” but you can call your network whatever you like. Type the name you’ve chosen for your network into the empty field labeled
Network Name.
Leave the Channel option set to the default of 11 as there is no need to change it. The complexity of Wi-Fi channels is far beyond the scope of this Guide but if you would like to learn more about them you can do so here.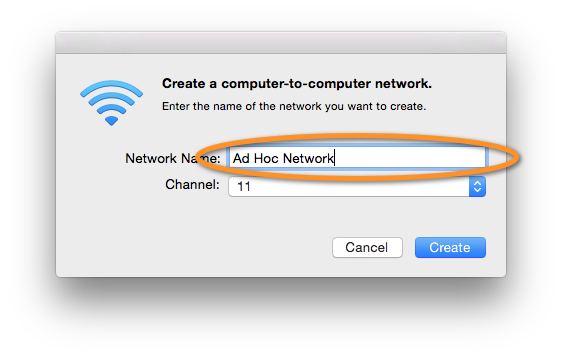
Click Create and the Ad-Hoc Network should now be created. You can tell if it worked or not by looking at your Wi-fi icon on your Apple Menu Bar across the top of your screen. A new symbol should be in its place that looks like this: ![]()
The network should also appear under “Devices” towards the bottom of the list of networks within the Wi-Fi icon drop down menu: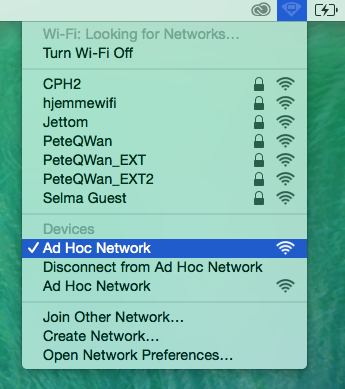
Anyone you wish to share your network with can join by selecting it in the Wi-Fi menu on their device without entering a password.
Creating an Ad Hoc Network using an Apple Airport Express
Using OS X to create an Ad Hoc Network can be very effective but as previously metioned, the security options are limited to 40-Bit and 128-Bit WEP. Introducing an Apple Airport Express into your Ad Hoc Network offers you much stronger and more convenient security options, as well as increased reliability and network range.
The Airport Express is capable of using the new standard of encryption for wireless security by default without any extra setup from the user.
Another difference that should be noted between a wireless router such as an Airport Express and an Ad Hoc Network based off a computers network adapters is that the wireless router will not lose it’s configuration when it’s been powered down or unplugged. This allows for consistency between uses as the network name and the password will be the same every time you plug the wireless router in.
If you’re having trouble generating a strong password, try using this Random Password Generator. Here you are able to customize how many passwords to generate so you have a few to choose from as well as how long you would like the password to be.
Understanding the Apple Airport Express
An Apple Airport Express is essentially a very small wireless router that is can be configured using Airport Utility, which comes with Mac OS X. The set-up is fairly simple and does not require deep technical knowledge or skills.
NOTE: It is possible to create an Ad Hoc Network with other wireless routers besides the Airport Express, but the ease of navigating the Airport Utility makes the Airport Express a particularly good choice.
Step 1. Connecting to a new Airport Express
Start by plugging in the Airport Express. You should notice a light flashing on the front of the small white router. This signals that it is ready to be set up.
In OS X on your computer, click the Spotlight icon (it looks like a magnifying glass) to initiate a search. A small blue search field should appear:

In this search field, enter “Airport Utility” without the quotes and this should be the result:
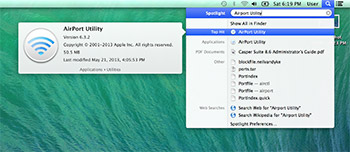
Launch the Airport Utility application by clicking on it’s name in the resulting drop down menu. The new window should appear similar to this:
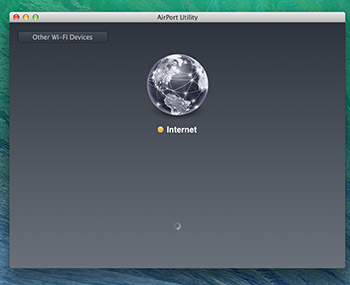
If your Airport Express has fully booted and your computer has been given enough time to look for it, the button “More Wi-Fi Devices” in the upper left corner of the Airport Utility should have (1) next to the text.
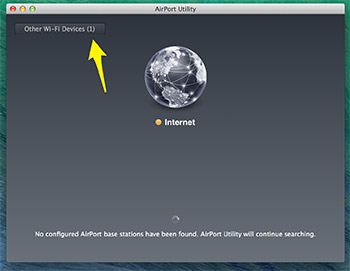
Click the More Wi-Fi Devices button to reveal the default name given to your Airport Express in a small dropdown menu.
From here, select name of your Airport Express from the dropdown menu as shown here highlighted in blue:
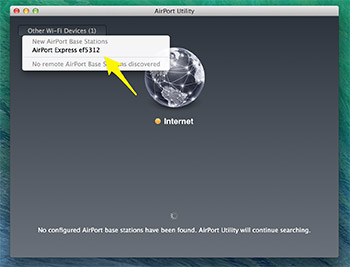
This should initiate a connection between your Airport Express and your computer. It may take a minute or two for the Utility to fully connect and move you to the first stage of the Airport Express Configuration process.
Step 2. Configuring the Airport Express
The first stage of the configuration process will require you to name your network and the Airport Express:
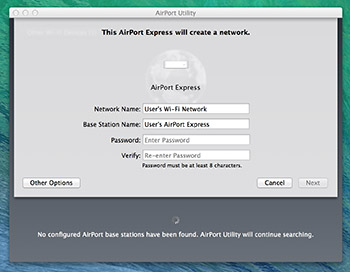
As you can see there are 4 text fields that need to be filled in with the last two being the password you’re going to use. They are:
1. Network Name
2. Base Station Name
3. Password
Enter the name of your choice into the Network Name field. You can name your new wireless network whatever you would like, but keep in mind that the individuals connecting to it will see this name. For this example, we are using Ad Hoc Network as the network name.
Enter the name you’d like to call your Airport Express in the Base Station Name field. Naming your Airport Express allows you to differentiate between multiple Airport Express units if more than one is operating within a single location. For this example, we have left the Base Station Name the same as the Network name.
Enter the same password in the Password and Verify fields. Choosing a strong password for your wireless network is a best practice for making sure your network stays secure. Strong passwords mix upper and lower case letters with numbers in a string that doesn’t form a word such as:
- R6puKpS9
- Ghy5WeLM
- T4AzPycD
- LqtEtbLp
- GXqTMKtG
Using passwords with this level of complexity is sound security practice for a wireless network.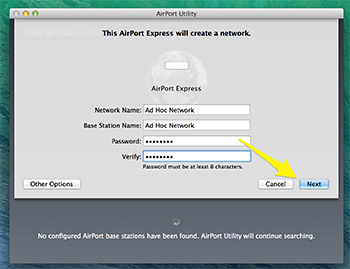
Upon clicking the Next button you will be presented with a new screen informing you that the Airport Express cannot find an internet connection. That is fine as you are creating your own network. Simply click the Next button to move forward with configuring the Ad Hoc Network.
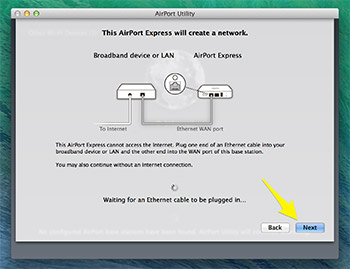
The next screen should look similar to the following. This screen indicates that the Airport Express is in the process of setting up and configuring your new wireless network.
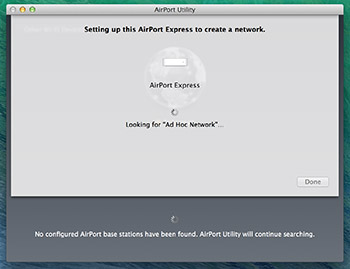
Finally, once the device has completed the setup you’ll be presented with this screen:
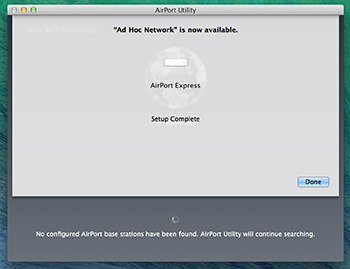
You can now click Done in the bottom right hand corner of the previous screenshot to conclude the configuration process of your new Ad Hoc network.
3. Editing the Settings of the Ad Hoc Network
To begin editing the settings for the existing Ad Hoc Network, we’ll need to use Airport Utility again. Follow the steps at the beginning of Section 1 to launch Airport Utility. Once the app is open you should see the following:
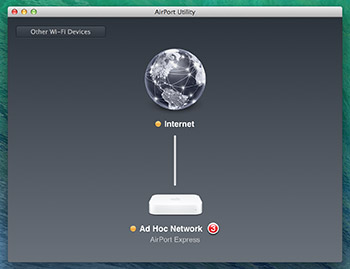
By now you’ve probably noticed the big red circle with a 3 in it and an orange blinking light on either side of the white Airport Express icon. If we were trying to connect to a pre-existing network, that would be troubling but in our situation it’s perfectly ok as with an Ad Hoc network there isn’t always internet connectivity.
To make the blinking orange light and red circle with the 3 in it go away, click on the white Airport Express icon just above the text that displays your network name below it. Upon doing so you should see something similar to this:
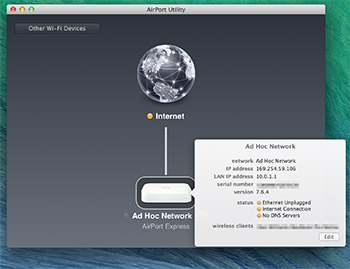
Here you can see 3 options with orange dots next to the text Status that read Ethernet Unplugged, Internet Connection, and No DNS Servers.
The first error message, Ethernet Unplugged, is normal due to the fact I have no Ethernet cables plugged in to the back of the device and the setup happening over Wi-Fi. If you wish to connect to the Airport Express via cable instead of wirelessly, you can run an Ethernet cable from the computer or device to the Ethernet port on the right side of the back of the Airport Express as per this photo:
The second error message listed is Internet Connection. This is just warning that the Airport Express has no connection to the internet. Internet connections are not required for Ad Hoc Networks so you can disregard this error message. If you wanted to use the Airport Express to extend your internet signal instead of building an Ad Hoc Network, you could run an Ethernet cable from your broadband modem to the back left Ethernet port of the Airport Express:
The final error message we see is No DNS Servers. In short, a DNS server is a service that computers use when reaching out to addresses on the internet to transform URLs into computer readable IP addresses by translating our English alphabet into a numerical address so the computer knows where we’re trying to go.
Apple computers have the ability to name themselves and perform that translation on a basic network themselves, using what is called a MAC address. This is a unique address given to the network adapter of your computer so the Airport Express knows it’s sending the right web traffic to the right place. The MAC address of your computer functions as the equivalent of a house number on a mailing address.
Imagine you live in an apartment building and you are throwing a small party for friends. Now say you want to invite a friend that lives in the same building. You would mention to your neighbor that you live in apartment 3B signifying you live in apartment B on the 3rd floor instead of giving the entire street address of your apartment building. When computers are on the same local network, talking to each other works much in the same way, therefore a DNS server is not needed.
In order to dismiss these three errors, click on the text of each individual error in the popup and select the option Ignore as seen here:
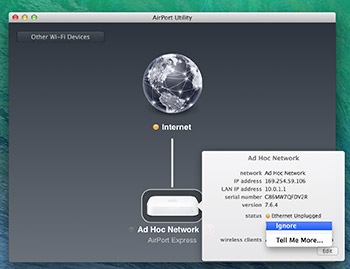
The remaining lights should now be green and the red circle with the 3 in should no longer be visible.
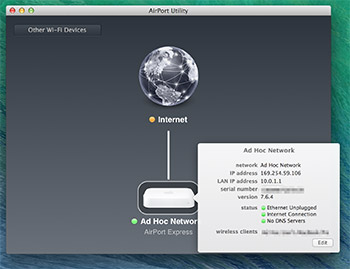
Setting Up the Wireless Router Password
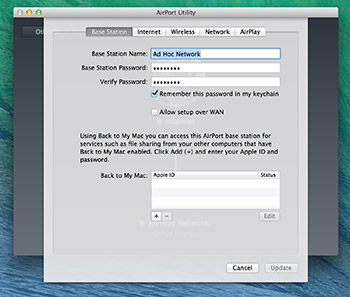
The password set in the Create a computer-to-computer network dialog box protects the Wireless Network you’ve created. You will need a second password to protect the wireless router itself.
To set the router password, click the Edit button in the lower right hand corner of Airport Utility dialog window:

A new window will pop up displaying the Base Station name and two fields for the Base Station password. Enter the password you wish to use for your Airport Express router in both password fields.
Changing the Wireless Network Password
If you wish to change the password you set up when you created the wireless network (this is the one you will give users connecting to your Ad Hoc Network), you can do so from within the Airport Utility by clicking on the Wireless tab:
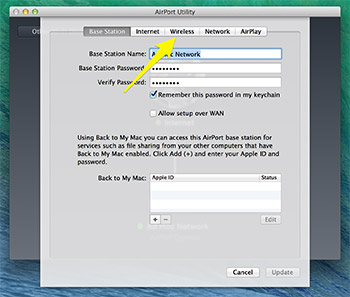
Within the Wireless pane, there are multiple editable fields including:
1. Network Name
2. Wireless Security
3. Wireless Password
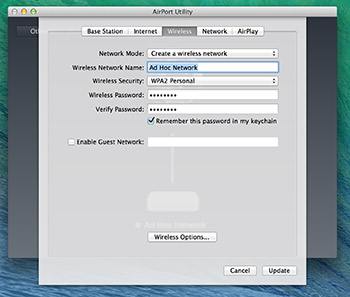
In the initial setup, we configured a Wireless Name and Wireless Network Password. The difference now is that you have the ability to edit your Wireless Security Encryption type.
The default Encryption Type should be WPA2/Personal, which is the most secure standard offered. WPA2 should more than suffice for tethered photography through a wireless router.
NOTE: None of the Enterprise options listed under the Wireless Security option will work unless the additional authentication servers used in an enterprise environment are available to connect to them.
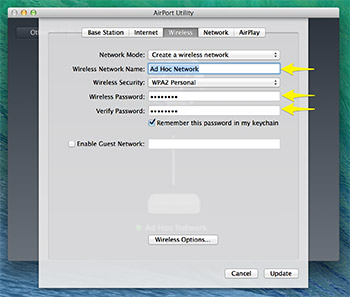
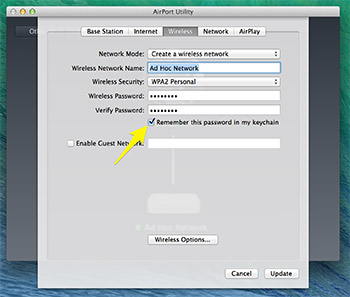
Note: If you want your computer to automatically save the new Network Name and Password you’ve put in, you’ll need to check the box marked “Remember this password in my keychain” below the Verify Password text field:
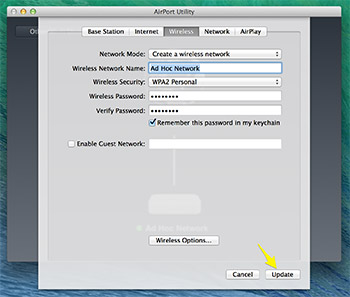
Once you’ve entered the new Network Name and Password to your wireless network into both fields, click the Update button:
When the update is complete, a new drop down pane will inform you that it is necessary to restart your Wireless Router in order to apply the changes:
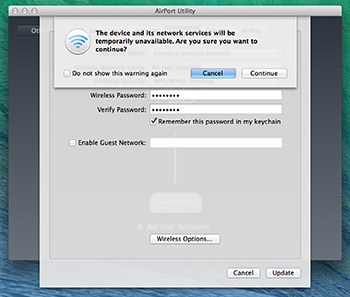
Click the Continue button and your wireless router will proceed to restart.
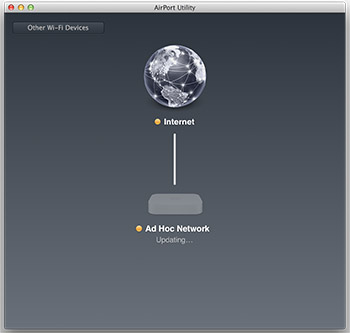
The restart will be indicated by the Airport Utility app displaying the following screen:
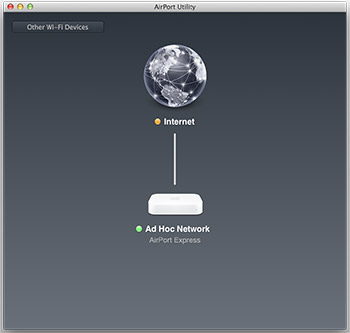
This may take a few moments depending on how much information you changed. Once the device has come back up and you’ve reconnected, you will see the Airport Utility app return to the default screen:
Disconnecting An Ad-Hoc Network
To disconnect your network and return your computers Wi-Fi card to it’s default state, click the new icon that’s replaced your Wi-Fi icon detailed in the above screenshot, to reveal the drop down list of networks.
As mentioned earlier, you may have more or fewer options than shown depending on the number of wireless networks around you. Immediately below the name of your Ad Hoc Network, you’ll find the option to disconnect from the network you created.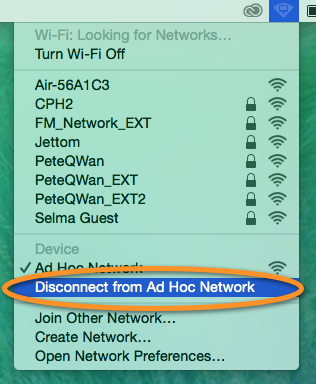
Once you click this option, the Ad Hoc Network that you created is disconnected and the network icon in the Apple Menu Bar will change back to the Wi-Fi icon:
Where to Go If You Need Help
Should you find yourself having any questions about the Ad-Hoc Network on Mac OS X, the following resources are available to you:
Apple Support Website– Apple’s own knowledgebase for support articles covering all things Mac. This support article by Apple details how to set up Ad Hoc Networks.
Apple Discussion Forums – Apple’s discussion forums allow you to ask questions on any Apple related products or functionalities and get answers from Apple’s own specialists and other knowledgeable individuals. It’s very useful for anyone having issues not covered by basic troubleshooting practices that are outlined on the Apple Support Website mentioned above.
You can also stop by your local Apple Store or call them at 1-800-MYAPPLE (Though fees may apply depending on your warranty status).
Airport Express – You can find product support for the Apple Airport Express at:
https://www.apple.com/support/airport/basestations/
Should you find yourself in a situation in which you are unable to find a solution to the issues you are experiencing, the Airport Express comes with a 1 Year Warranty that allows you to make a Genius Bar appointment at your local Apple Store where a trained professional will diagnose the issues and either fix the problem or replace your device should it fall under Apple’s hardware replacement policy. You can find your local Apple Store and schedule Genius Bar appointment here:
https://www.apple.com/retail/locator/


