As a photographer or filmmaker there are times that you’ll want to secure a camera in place but a tripod just isn’t an option. You’re in a high-traffic, public place where tripods aren’t allowed, or you need to mount your camera in a precarious place where a tripod or studio stand simply wouldn’t work. If you need to leave your tripod at home but want camera stability, we have you covered.
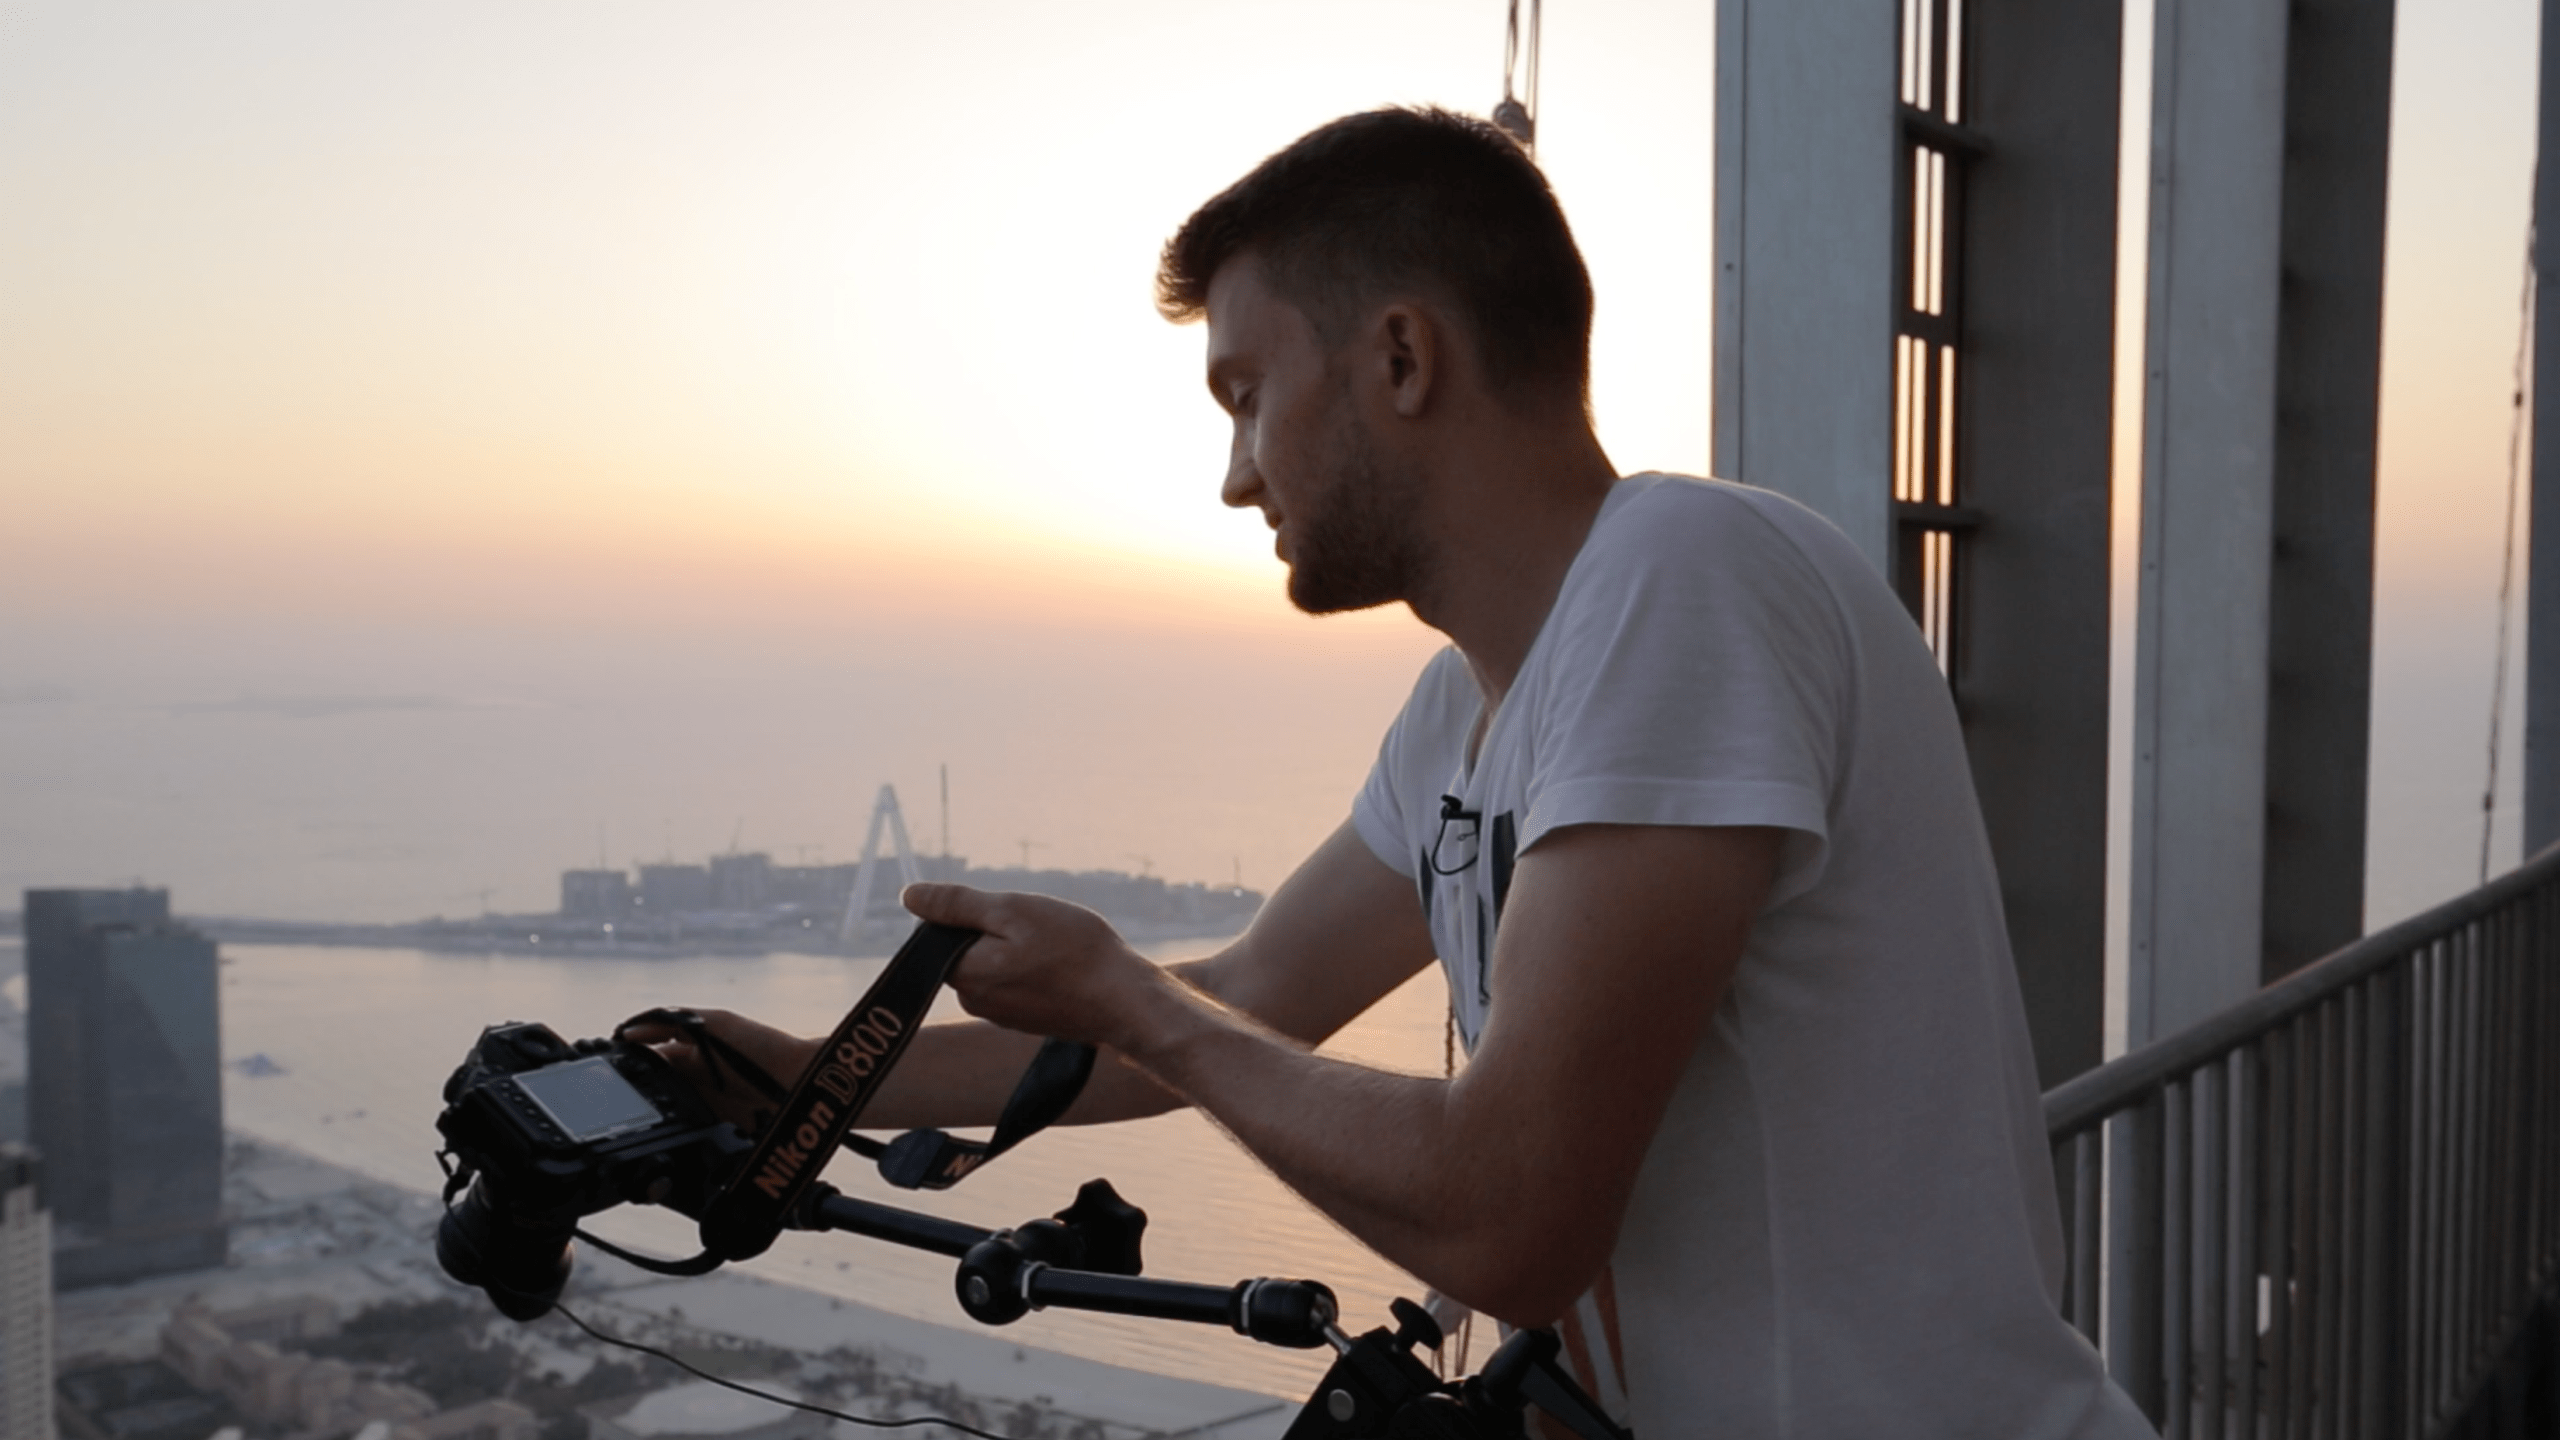
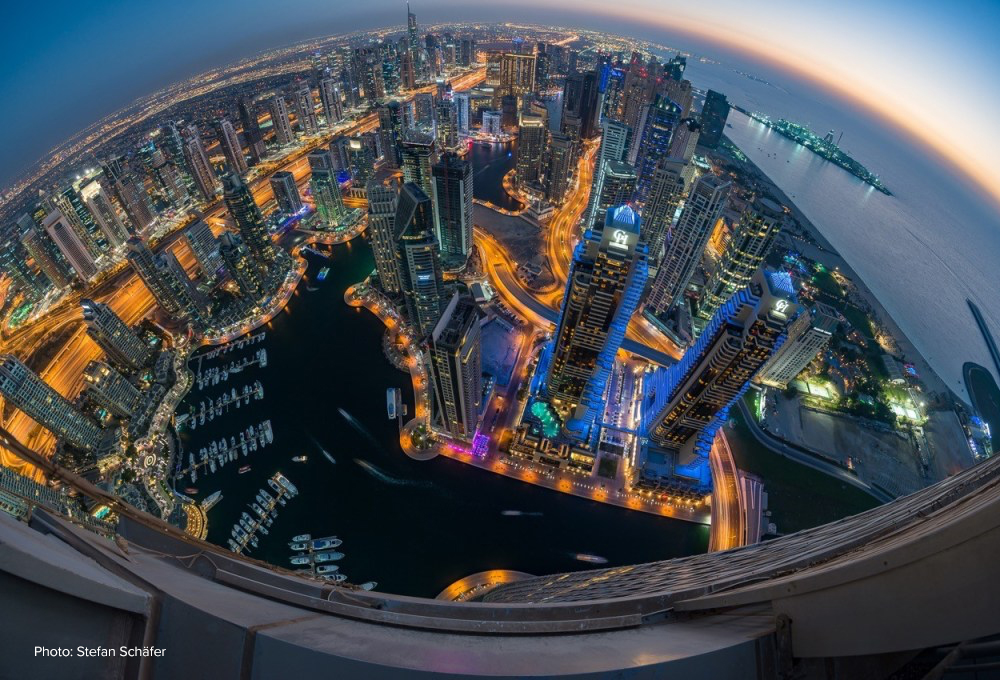
Berlin-based photographer Stefan Schäfer specializes in landscape and cityscape photography and recently traveled to Dubai to photography the skyrises. Stefan took his setup which consists of a Rock Solid Master Clamp, Master Articulating Arm, and Camera Platform and mounted his Nikon D800 camera 73 stories up on the railing of the Cayan Tower in Dubai.
“The biggest advantage for me came with the so-called Vertical Shots. In these pictures, I am standing on a high-rise building and photographing with the camera 90-degrees downwards tilted straight down. This gives a very impressive perspective, usually unseen in other landscape and cityscape photos of Dubai,” wrote Stefan. “Here the arm plays its advantages completely out in contrast to a normal tripod. With the arm I can get far away from the building and still have extreme stability. The Master Articulating Arm has locking teeth and pad slips to keep everything secured. The setup is extremely stable and easily held the weight of the setup.”
Advantages of this setup:
Extremely stable and also suitable for heavy cameras and other things
By loosening the center-screw on the arm, you can move the arm to where you need it
In this setup, Daniel Norton and Seth Miranda needed to mount a camera to shoot vertically up a stairwell. Unfortunately, due to the precarious placement of where the camera needed to be located a tripod or studio stand simply wouldn’t work as the area couldn’t be blocked and there was no room.
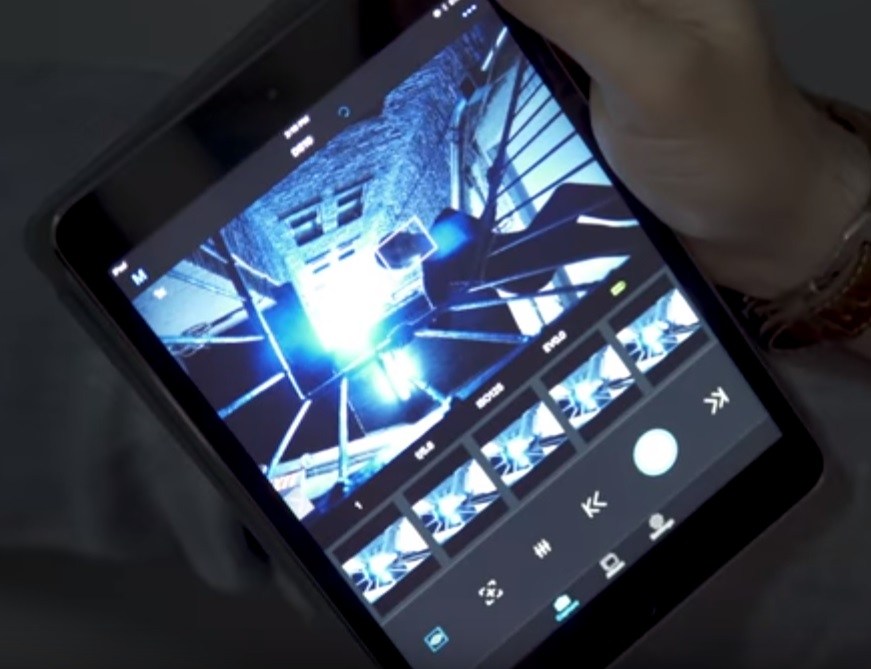
The photographers instead mounted a camera to a hanging pipe using the same setup previously mentioned, a Rock Solid Master Clamp, Master Articulating Arm, and Camera Platform. Their setup differs slightly as they incorporated the Case Air Wireless Tethering System. This enabled Seth and Daniel to tether their camera wireless to an iPad allowing them to use LiveView to see an image preview and move the model into the ideal position, as well as adjust camera settings on the fly such as aperture, shutter speed, and ISO.
“The Case Air made us more aware of our own environment instead of being stuck inside our camera. So, we were actually participating as well as observing. We got shots that we wouldn’t have gotten any other way,” said photographer Seth Miranda.
Advantages of this setup:
Mounting the camera and the adjustable arm allows the camera new perspectives
The Case Air enables the photographer to view images in LiveView and trigger remotely
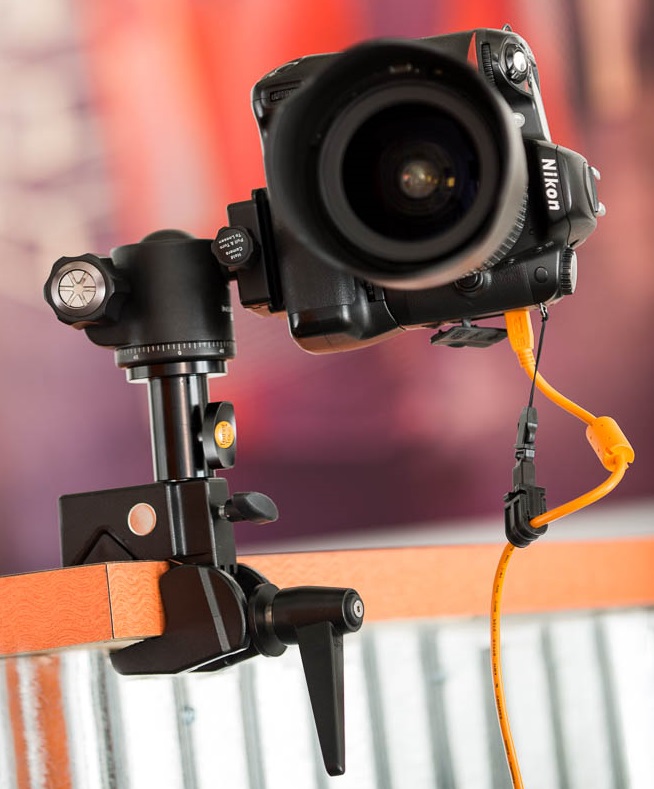
If you have a flat or round surface, you have a place to mount your tripod head or camera ballhead. This setup utilizes the Rock Solid Master Clamp and it’s included 5/8″ (16mm) Baby Stud to add a sturdy and stable spot to place your camera where you want it, when you need it. The Rock Solid Baby Ballhead Adapter converts the Baby Stud to a 3/8″ thread for easy mounting of your tripod head. From there, secure your camera and move into place to get the shot.
Advantages of this setup:
Lightweight and portable
Extremely stable and utilizes your tripod ball head
This website stores cookies on your computer. These cookies are used to collect information about how you interact with our website and allow us to remember you. We use this information in order to improve and customize your browsing experience and for analytics and metrics about our visitors. Accept
This website uses cookies to improve your experience while you navigate through the website. Out of these, the cookies that are categorized as necessary are stored on your browser as they are essential for the working of basic functionalities of the website. We also use third-party cookies that help us analyze and understand how you use this website. These cookies will be stored in your browser only with your consent. You also have the option to opt-out of these cookies. But opting out of some of these cookies may affect your browsing experience.
Necessary cookies are absolutely essential for the website to function properly. These cookies ensure basic functionalities and security features of the website, anonymously.
Cookie
Duration
Description
cookielawinfo-checkbox-analytics
11 months
This cookie is set by GDPR Cookie Consent plugin. The cookie is used to store the user consent for the cookies in the category "Analytics".
cookielawinfo-checkbox-functional
11 months
The cookie is set by GDPR cookie consent to record the user consent for the cookies in the category "Functional".
cookielawinfo-checkbox-necessary
11 months
This cookie is set by GDPR Cookie Consent plugin. The cookies is used to store the user consent for the cookies in the category "Necessary".
cookielawinfo-checkbox-others
11 months
This cookie is set by GDPR Cookie Consent plugin. The cookie is used to store the user consent for the cookies in the category "Other.
cookielawinfo-checkbox-performance
11 months
This cookie is set by GDPR Cookie Consent plugin. The cookie is used to store the user consent for the cookies in the category "Performance".
viewed_cookie_policy
11 months
The cookie is set by the GDPR Cookie Consent plugin and is used to store whether or not user has consented to the use of cookies. It does not store any personal data.
Functional cookies help to perform certain functionalities like sharing the content of the website on social media platforms, collect feedbacks, and other third-party features.
Performance cookies are used to understand and analyze the key performance indexes of the website which helps in delivering a better user experience for the visitors.
Analytical cookies are used to understand how visitors interact with the website. These cookies help provide information on metrics the number of visitors, bounce rate, traffic source, etc.
Advertisement cookies are used to provide visitors with relevant ads and marketing campaigns. These cookies track visitors across websites and collect information to provide customized ads.

 Berlin-based photographer Stefan Schäfer specializes in landscape and cityscape photography and recently traveled to Dubai to photography the skyrises. Stefan took his setup which consists of a Rock Solid Master Clamp, Master Articulating Arm, and Camera Platform and mounted his Nikon D800 camera 73 stories up on the railing of the Cayan Tower in Dubai.
“The biggest advantage for me came with the so-called Vertical Shots. In these pictures, I am standing on a high-rise building and photographing with the camera 90-degrees downwards tilted straight down. This gives a very impressive perspective, usually unseen in other landscape and cityscape photos of Dubai,” wrote Stefan. “Here the arm plays its advantages completely out in contrast to a normal tripod. With the arm I can get far away from the building and still have extreme stability. The Master Articulating Arm has locking teeth and pad slips to keep everything secured. The setup is extremely stable and easily held the weight of the setup.”
Berlin-based photographer Stefan Schäfer specializes in landscape and cityscape photography and recently traveled to Dubai to photography the skyrises. Stefan took his setup which consists of a Rock Solid Master Clamp, Master Articulating Arm, and Camera Platform and mounted his Nikon D800 camera 73 stories up on the railing of the Cayan Tower in Dubai.
“The biggest advantage for me came with the so-called Vertical Shots. In these pictures, I am standing on a high-rise building and photographing with the camera 90-degrees downwards tilted straight down. This gives a very impressive perspective, usually unseen in other landscape and cityscape photos of Dubai,” wrote Stefan. “Here the arm plays its advantages completely out in contrast to a normal tripod. With the arm I can get far away from the building and still have extreme stability. The Master Articulating Arm has locking teeth and pad slips to keep everything secured. The setup is extremely stable and easily held the weight of the setup.”
 In this setup, Daniel Norton and Seth Miranda needed to mount a camera to shoot vertically up a stairwell. Unfortunately, due to the precarious placement of where the camera needed to be located a tripod or studio stand simply wouldn’t work as the area couldn’t be blocked and there was no room.
The photographers instead mounted a camera to a hanging pipe using the same setup previously mentioned, a Rock Solid Master Clamp, Master Articulating Arm, and Camera Platform. Their setup differs slightly as they incorporated the Case Air Wireless Tethering System. This enabled Seth and Daniel to tether their camera wireless to an iPad allowing them to use LiveView to see an image preview and move the model into the ideal position, as well as adjust camera settings on the fly such as aperture, shutter speed, and ISO.
“The Case Air made us more aware of our own environment instead of being stuck inside our camera. So, we were actually participating as well as observing. We got shots that we wouldn’t have gotten any other way,” said photographer Seth Miranda.
In this setup, Daniel Norton and Seth Miranda needed to mount a camera to shoot vertically up a stairwell. Unfortunately, due to the precarious placement of where the camera needed to be located a tripod or studio stand simply wouldn’t work as the area couldn’t be blocked and there was no room.
The photographers instead mounted a camera to a hanging pipe using the same setup previously mentioned, a Rock Solid Master Clamp, Master Articulating Arm, and Camera Platform. Their setup differs slightly as they incorporated the Case Air Wireless Tethering System. This enabled Seth and Daniel to tether their camera wireless to an iPad allowing them to use LiveView to see an image preview and move the model into the ideal position, as well as adjust camera settings on the fly such as aperture, shutter speed, and ISO.
“The Case Air made us more aware of our own environment instead of being stuck inside our camera. So, we were actually participating as well as observing. We got shots that we wouldn’t have gotten any other way,” said photographer Seth Miranda.
 If you have a flat or round surface, you have a place to mount your tripod head or camera ballhead. This setup utilizes the Rock Solid Master Clamp and it’s included 5/8″ (16mm) Baby Stud to add a sturdy and stable spot to place your camera where you want it, when you need it. The Rock Solid Baby Ballhead Adapter converts the Baby Stud to a 3/8″ thread for easy mounting of your tripod head. From there, secure your camera and move into place to get the shot.