
*This is a guest post from Fable Studios, a video production agency in Bristol, United Kingdom.
Everyone loves a mouth-watering photo of food, especially if the plate presentation is akin to an art installation which, in today’s Instagram-friendly restaurants, is quite common. It’s also quite normal to see people hovering over their dinner with phone in hand to capture a great photo to make friends, family, followers envious. And if you’re reading this article, probably you yourself have dabbled with food photography and want to see if there’s anything more you could be doing to improve the end results. Below, I’ve compiled some tips worth sharing that can help with getting the most, visually, out of your dinner (can’t help with the taste of it I’m afraid!).
Editing
Perhaps strange to start the tips with what you should do at the very end of the photography process but here it is anyway. Unless you’re a film camera user, editing is now as much a part of still photography as framing or composition. It’s standard to touch up photos to some degree; varying dependent on the subject matter. For food photography, saturation and vibrancy are the two most important tools at your disposal for bringing out the beautiful colours of the food items. They can make even quite colourless foods look tantalising by emphasising the colour contrast and intensity.
Take for example fish and chips, a great staple of English fast food culture. In the two shots below, we can immediately see the importance of colour saturation and vibrancy.
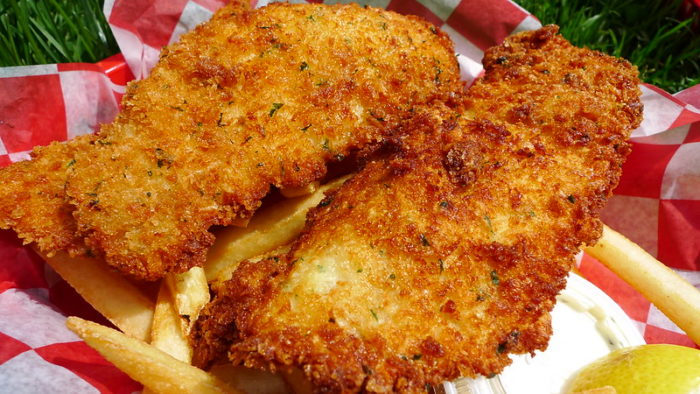
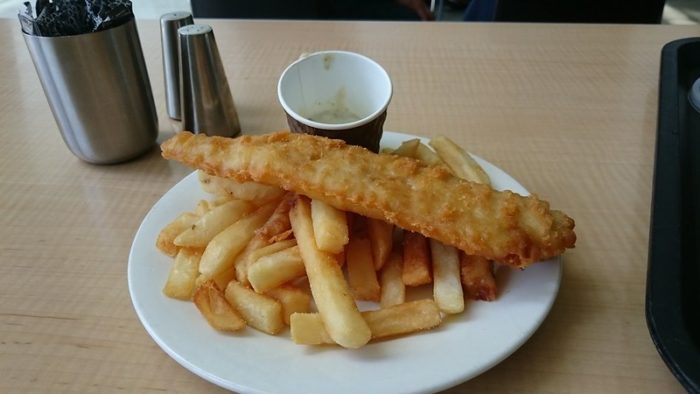
The photo on the top is where the eye is drawn naturally as the golden batter becomes such an appealing colour. By sliding the vibrancy and saturation scales up to the desired amount we can achieve this look quite easily; enhancing the natural colours in the frame. If you’re taking RAW files with an actual camera, tethering is a great option to speed up workflow as you can see what your shots are like full screen as well as the ability to play around with editing as soon as you take the photo. Learning by doing is always the best way and tethering your camera to the computer encourages and allows for this process to flourish.
Background
This is another important part of food photography that again the above two photographs highlight the importance of, background. As the plate and food take centre stage, still attention must be paid to the background to take the overall aesthetic up a notch. The red and white checkerboard pattern paper and verdant green grass of the left image adds a feeling to the picture that we likely all have experienced; enjoying a meal outdoors in fine weather. Choosing the right background places the food within a familiar context that adds another appealing layer to the photograph.
The food always takes centre stage, but the background can change the feel as the fabric throw above can prove. The beige fabric cloth offers no distraction but still offers a clean and consistent background which lets the bright colours of the food really shine. This is usually the best way to go to showcase the subject matter in the best way possible. However, as we’ve seen, you can choose to create a certain feeling like a picnic on a summer’s day to by placing the food in a particular environment.
Improvisation
The tips in this section are for the more adventurous food photographer as they’re geared towards product photography though can absolutely be applied by aspiring foodies to capture the very best of their ingredients. These are the MacGyver-type solutions to having total control over the shoot.
If you’re trying to capture the glisten of condensation on a glass or bowl to give that ice cold feel, spray deodorant can be the perfect solution if you can’t replicate the look naturally. To go along with the frosty look made by deodorant, vaseline around the glass rim will allow sugar or salt to stay put without sliding down the glass. This ensures an even and consistent coating around the rim which means that you as photographer are always in control. As the state of food is often changing; melting, steaming, boiling, etc. it’s important to be able to manipulate it to your wishes.
In some cases, you might not even be photographing real food but an illusion of it. Shaving cream can easily be mistaken for whipped cream for example and again is a much more malleable and compliant substance than the real thing. Food styling is an important part of professional photo shoots and while some of the tips may never be used, it’s important to improvise whenever necessary to get the perfect shot.
Lighting
Lighting – the single most important aspect of all photography and so of course it features in this list too. Correct lighting is essential in food photography in part because it allows for the best possible post processing. Having the subject matter bathed in multi-source light means that everything is well lit which therefore provides more data for you to manipulate in the editing suite. Once again you also have control over the process and can ensure that the subject matter isn’t over or under exposed thanks to artificial lighting.
Lighting is a part of photography that can be done on a big budget as well as a small one. Improvising with flashlights shone through paper or any kind of diffuser you can invent can completely change the final results as well as experimentation with different colours. While editing can offer many practical benefits, it’s also great fun to play around with the scene itself. Try flashlights with coloured paper, thin fabrics or even other light sources; phone screen, TV, etc.
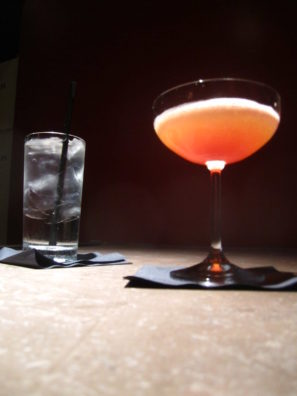
Light allows the colours of foods and especially liquids to really shine; even clear liquids (with ice!) can offer visual intrigue by playing with reflection and magnification. The above photograph illustrates the powerful enhancing effect of light as it brings out the wonderful reds in the drink and even allows the clear drink to stand out in its own right.
As always, the best way to improve anything is trial and error, photography is no different. However, it always helps to have some direction when you’re trying new things so hopefully these tips will have pointed you in the right direction!
Author Bio
Rob Holder is the Director of Fable Studios, a video production agency in Bristol, UK.
Get The Tethering Gear
-
TetherPro USB-C to USB-C 5G Cable
Price range: $26.99 through $59.99 Select options This product has multiple variants. The options may be chosen on the product page -

TetherBlock®
$99.99 Add to cart