Over the last 30+ years, Dave Montizambert has created images for the likes of McDonalds Foods, Motorola and Warner Brothers. His photos have garnered awards from Georgie, Lotus, Hemlock, Studio Magazine, CAPIC and Graphex. Dave is part of the Influencer Program at Adobe and is part of the beta test program for Photoshop and Lightroom.Dave’s work and articles on photography lighting have been featured in international publications such as Professional Photographer & Digital Pro Magazine, Professional Image Maker UK, Ranger Finder USA, British Institute of Professional Photography Magazine, Photo Life in Canada and many others. For more than 20 years, Dave taught the highly anticipated five-day digital imaging and photographic lighting course at the Western Academy of Photography in Victoria, BC. He also taught a 13-week photography course at Capilano University in Vancouver, BC. Because of his engaging method of teaching as well as the unique insights he has on lighting in photography and digital manipulation, Dave is a sought after international lecturer whose in-depth talks attract photographers of all levels and specialties. Dave’s down-to-earth teaching approach helps photographers everywhere with his books—Creative Lighting Techniques for Studio Photographers and Professional Digital Photography both (Amherst Media)—as well as dozens of video tutorials that now form the core of Dave On Demand.As one of the few photographers in the world qualified to teach Dean Collins’ lighting theories, Dave is passionate about continuing to sharing this legacy of knowledge through his new online photography tutorials.
How I Got The Shot by Dave Montizambert
Part of my early lighting training with international lighting star Dean Collins was creating multiple light source from only one light. This teaches a newbie so much more about lighting than having the advantage of many lights—making one light do the work of many by redirecting light through diffusion materials or redirecting by bouncing off reflectors makes one really learn to think and makes one really learn their craft. One of my lighting workshops, called One Light Madness, is on this subject. The images you see here are from this workshop.
I shot these images with my camera using the Tether Tools Tether Table Aero System and TetherPro USB cable to shoot tethered to my MacBook. Shooting tethered is a really great aid, it allows me to see the image on a larger screen which also allows me to zoom in to check sharpness and fine details. I find it is invaluable for teaching workshops and for working with art directors—they really get to see how the image progresses on the fly! Before Tether Tools I was always looking for tables and what-not to place my computer on, not very convenient or space efficient.
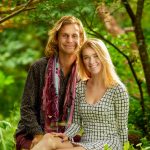
Shot 1: In the Garden
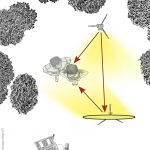
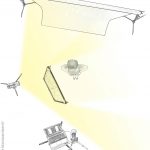
The image of the couple hanging out in the garden (played by models Emma Cartlidge of Coultish Management in Victoria BC and Aidan Maxereeux also in Victoria BC), was actually shot on an overcast day. To create the look of sunlight, I backlit them with a really old Vivitar 285 flash from the 1980’s. A lot of this flash’s light spills past our subjects and strikes the white side of a White/Gold reflector. This light then ricochets off the reflector and onto their fronts. I positioned the Vivitar so that 2 stops more light hit the back edges of the subjects than did hit their fronts. The exposure for this image was F 4 1/30th at 100iso.
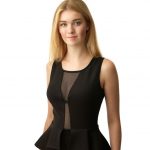
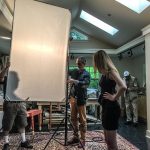
Shot 2: Emma on White
The image of Emma standing against a pure white background was also a one light setup. Emma stood in front of a white seamless backdrop (a light coloured wall would work the same). A Lightrein studio strobe was positioned so that it lights both Emma and the background at the same time. The trick here is to overexpose the background to pure white while keeping the subject correctly exposed. To do this you actually have to darken the subject by adding some diffusion material between the subject and the strobe, then compensate for the underexposed subject by turning the power of the strobe up (or you could re-adjust the camera exposure). I read change in light with my Sekonic incident flash meter so that I would know exactly how much to adjust by. I used a Chimera 4×8 foot panel frame with a white diffusion material stretched over it making sure to place it so that it only affects the light hitting Emma and not the background. This panel alters the light hitting Emma making her about 2 stops darker and since the panel creates a much larger source of illumination, creates a much softer quality of light on Emma than would the unfettered direct light from the Lightrein strobe. The exposure was F 8 1/120th at 100iso.
This website stores cookies on your computer. These cookies are used to collect information about how you interact with our website and allow us to remember you. We use this information in order to improve and customize your browsing experience and for analytics and metrics about our visitors. Accept
This website uses cookies to improve your experience while you navigate through the website. Out of these, the cookies that are categorized as necessary are stored on your browser as they are essential for the working of basic functionalities of the website. We also use third-party cookies that help us analyze and understand how you use this website. These cookies will be stored in your browser only with your consent. You also have the option to opt-out of these cookies. But opting out of some of these cookies may affect your browsing experience.
Necessary cookies are absolutely essential for the website to function properly. These cookies ensure basic functionalities and security features of the website, anonymously.
Cookie
Duration
Description
cookielawinfo-checkbox-analytics
11 months
This cookie is set by GDPR Cookie Consent plugin. The cookie is used to store the user consent for the cookies in the category "Analytics".
cookielawinfo-checkbox-functional
11 months
The cookie is set by GDPR cookie consent to record the user consent for the cookies in the category "Functional".
cookielawinfo-checkbox-necessary
11 months
This cookie is set by GDPR Cookie Consent plugin. The cookies is used to store the user consent for the cookies in the category "Necessary".
cookielawinfo-checkbox-others
11 months
This cookie is set by GDPR Cookie Consent plugin. The cookie is used to store the user consent for the cookies in the category "Other.
cookielawinfo-checkbox-performance
11 months
This cookie is set by GDPR Cookie Consent plugin. The cookie is used to store the user consent for the cookies in the category "Performance".
viewed_cookie_policy
11 months
The cookie is set by the GDPR Cookie Consent plugin and is used to store whether or not user has consented to the use of cookies. It does not store any personal data.
Functional cookies help to perform certain functionalities like sharing the content of the website on social media platforms, collect feedbacks, and other third-party features.
Performance cookies are used to understand and analyze the key performance indexes of the website which helps in delivering a better user experience for the visitors.
Analytical cookies are used to understand how visitors interact with the website. These cookies help provide information on metrics the number of visitors, bounce rate, traffic source, etc.
Advertisement cookies are used to provide visitors with relevant ads and marketing campaigns. These cookies track visitors across websites and collect information to provide customized ads.

 Over the last 30+ years, Dave Montizambert has created images for the likes of McDonalds Foods, Motorola and Warner Brothers. His photos have garnered awards from Georgie, Lotus, Hemlock, Studio Magazine, CAPIC and Graphex. Dave is part of the Influencer Program at Adobe and is part of the beta test program for Photoshop and Lightroom.
Dave’s work and articles on photography lighting have been featured in international publications such as Professional Photographer & Digital Pro Magazine, Professional Image Maker UK, Ranger Finder USA, British Institute of Professional Photography Magazine, Photo Life in Canada and many others. For more than 20 years, Dave taught the highly anticipated five-day digital imaging and photographic lighting course at the Western Academy of Photography in Victoria, BC. He also taught a 13-week photography course at Capilano University in Vancouver, BC. Because of his engaging method of teaching as well as the unique insights he has on lighting in photography and digital manipulation, Dave is a sought after international lecturer whose in-depth talks attract photographers of all levels and specialties. Dave’s down-to-earth teaching approach helps photographers everywhere with his books—Creative Lighting Techniques for Studio Photographers and Professional Digital Photography both (Amherst Media)—as well as dozens of video tutorials that now form the core of Dave On Demand.
As one of the few photographers in the world qualified to teach Dean Collins’ lighting theories, Dave is passionate about continuing to sharing this legacy of knowledge through his new online photography tutorials.
Over the last 30+ years, Dave Montizambert has created images for the likes of McDonalds Foods, Motorola and Warner Brothers. His photos have garnered awards from Georgie, Lotus, Hemlock, Studio Magazine, CAPIC and Graphex. Dave is part of the Influencer Program at Adobe and is part of the beta test program for Photoshop and Lightroom.
Dave’s work and articles on photography lighting have been featured in international publications such as Professional Photographer & Digital Pro Magazine, Professional Image Maker UK, Ranger Finder USA, British Institute of Professional Photography Magazine, Photo Life in Canada and many others. For more than 20 years, Dave taught the highly anticipated five-day digital imaging and photographic lighting course at the Western Academy of Photography in Victoria, BC. He also taught a 13-week photography course at Capilano University in Vancouver, BC. Because of his engaging method of teaching as well as the unique insights he has on lighting in photography and digital manipulation, Dave is a sought after international lecturer whose in-depth talks attract photographers of all levels and specialties. Dave’s down-to-earth teaching approach helps photographers everywhere with his books—Creative Lighting Techniques for Studio Photographers and Professional Digital Photography both (Amherst Media)—as well as dozens of video tutorials that now form the core of Dave On Demand.
As one of the few photographers in the world qualified to teach Dean Collins’ lighting theories, Dave is passionate about continuing to sharing this legacy of knowledge through his new online photography tutorials.