Chris Ord is an internationally published wedding and fashion photographer from Newcastle, United Kingdom.
Website: www.chrisordphoto.co.ukInstagram: https://www.instagram.com/chrisordphotoFacebook: https://www.facebook.com/chrisordphotographyYouTube: https://www.youtube.com/chrisordphotographyWhat was the concept of the shoot?
One my of big beliefs as a photographer is that it is extremely important to shoot for yourself when you can. Yes, you must pay the bills by taking on commissions and jobs, but ultimately the reason I fell in love with photography was through the creative freedom you have to create pretty much anything you like.
I work with a phenomenal hair and makeup team at my studio on a monthly basis in order for us all to keep our creative juices flowing. We start with a few different concepts for shoots, scout the models and refine the idea using Pinterest so that we all have a good idea of what we’d like to create. The shoots always stay quite fluid because something can change at short notice and really change the look or concept of the shoot.
With this particular shoot, I was testing a new piece of equipment from my friends at Pixapro, the 90cm DeepPara box. After shooting a few larger editorial projects through the year for publication I wanted to get back to shooting a simpler one light set up, and create several different effects with that setup. I talked with my hair and makeup team about the concept and the general idea was to have black and white makeup and then add a splash of colour using powder paint towards the end of the shoot. As you’ll see from the images this idea changed as the shoot evolved and we created some interesting shots without moving the light, or the subject.
What setup and lighting did you use to get the shot?
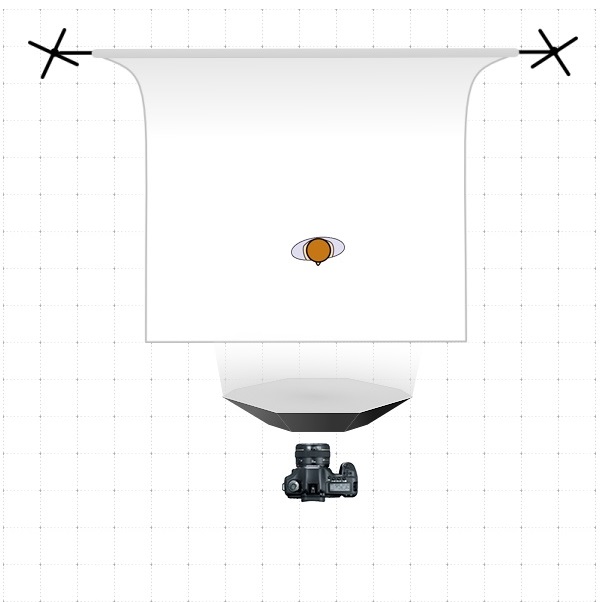
As mentioned above the modifier was the Pixapro 90cm DeepPara fitted with the grid to help control the light that little bit more, this was mounted on a Pixapro CITI600 strobe. I mounted the light above my head, I’m 6’5” so it was pretty high! I set up my camera on a tripod and tethered to my MacBook using the 5m Tether Tools TetherPro USB cable which helped me shoot a lot easier once the focus was locked in. This meant I could trigger the shutter from the screen without having to keep bending under the DeepPara.
Now, we essentially shot 3 different images with this one set up.Shot 1 – Double Exposure
For this first images, we wanted to create an ethereal feel, even ghost like along with the clown related makeup. There were two important elements with getting this right, getting two faces of the strobe at the right time, and having a high enough aperture to get both shots nice and sharp. This shot was taken at F22, with a 4 second exposure. The start of the shot triggered the first flash and I used an app called Colour screen on my iPhone and waved it in front of the lens for a second or so before triggering the second flash of the strobe manually with a second trigger to freeze the model, Alex, in the frame again. This took a good 10-15 shots to get right, and with the help of shooting tethered I turned the screen to our model so that she could see exactly what was going on and could plan he movement with a bit more ease. We used several different colours through the app to change the look quite drastically, but I preferred the red as it lent itself better to the cherry red backdrop.
Shot 2 – Paint
This shot was created pretty much by accident. I was lifting my aperture to F25 to allow more movement within the frame and shot a test frame off without triggering the second strobe flash. The shutter speed was still up at 4 seconds but because there was zero ambient light in the room there was no interference with the image at all. I loved the tone of this and how stark the paint was against the pale background. Shooting on a Canon 100mm Macro lens meant the level of detail was just incredible, and again shooting tethered meant that my Make Up Artist could see straight away on screen how the makeup looked and if we needed any touch ups.
Shoot 3 – Beauty
For this shot we didn’t move the lighting at all, but changed our way of shooting. I wanted to get a nice shallow aperture look and lose the background colour too. This is when the Pixapro CITI600 really comes into its own utilizing its High-Speed Sync function.
So, keeping our lighting and camera position exactly the same, we brought Alex a step closer to the camera. My settings this time were F2.8 shooting at 1/1000sec. This gave me the perfect amount of focus in the face tailing off just around the cheekbones of Alex and fading into that deep black background (which was red!). This shot was to show off the excellent makeup skills of our artists and really show what this incredible light and modifier can achieve.
How did shooting tethered help you achieve the shot you wanted?
As mentioned above, particularly for the dual exposure element, it was a huge advantage for the model to be able to see the image, where she was in the frame and how it looked. This allowed her to pose and move a lot more confidently within the frame. Whenever I shoot with a creative team or on a commercial shoot, it’s really important to me to be able to shoot tethered to get immediate feedback from my team or the client. I’ve tried various tethering options from Camera manufacturers software to Eyefi cards but the TetherPro USB Cable has without a doubt been the quickest and easiest way to shoot in this way.
What type of post-processing was involved?
In terms of retouching, I’m a fan of quick and simple. I use a retouching plug in for PhotoShop to do basic retouching, but on this shoot it didn’t really warrant a lot. I used a couple of custom edits to create the finished look, slightly desaturating the frame and adding a touch of contrast.
What was the logistics and/or gear needed to achieve this shot?
I shot this at my studio in the North East of England and the set up was very simple.
Canon 5D Mark III
Canon 100mm Macro F2.8
Apple MacBook
Tether Tools TetherPro USB Cable
Pixapro CITI600
Pixapro ST3 Trigger
Pixapro 90cm DeepPara
Creativity Backgrounds Cherry Red Paper background
Credits
Model – Alex Andlau
Hair – Stephanie O’Neill
Makeup – Rachel White
This website stores cookies on your computer. These cookies are used to collect information about how you interact with our website and allow us to remember you. We use this information in order to improve and customize your browsing experience and for analytics and metrics about our visitors. Accept
This website uses cookies to improve your experience while you navigate through the website. Out of these, the cookies that are categorized as necessary are stored on your browser as they are essential for the working of basic functionalities of the website. We also use third-party cookies that help us analyze and understand how you use this website. These cookies will be stored in your browser only with your consent. You also have the option to opt-out of these cookies. But opting out of some of these cookies may affect your browsing experience.
Necessary cookies are absolutely essential for the website to function properly. These cookies ensure basic functionalities and security features of the website, anonymously.
Cookie
Duration
Description
cookielawinfo-checkbox-analytics
11 months
This cookie is set by GDPR Cookie Consent plugin. The cookie is used to store the user consent for the cookies in the category "Analytics".
cookielawinfo-checkbox-functional
11 months
The cookie is set by GDPR cookie consent to record the user consent for the cookies in the category "Functional".
cookielawinfo-checkbox-necessary
11 months
This cookie is set by GDPR Cookie Consent plugin. The cookies is used to store the user consent for the cookies in the category "Necessary".
cookielawinfo-checkbox-others
11 months
This cookie is set by GDPR Cookie Consent plugin. The cookie is used to store the user consent for the cookies in the category "Other.
cookielawinfo-checkbox-performance
11 months
This cookie is set by GDPR Cookie Consent plugin. The cookie is used to store the user consent for the cookies in the category "Performance".
viewed_cookie_policy
11 months
The cookie is set by the GDPR Cookie Consent plugin and is used to store whether or not user has consented to the use of cookies. It does not store any personal data.
Functional cookies help to perform certain functionalities like sharing the content of the website on social media platforms, collect feedbacks, and other third-party features.
Performance cookies are used to understand and analyze the key performance indexes of the website which helps in delivering a better user experience for the visitors.
Analytical cookies are used to understand how visitors interact with the website. These cookies help provide information on metrics the number of visitors, bounce rate, traffic source, etc.
Advertisement cookies are used to provide visitors with relevant ads and marketing campaigns. These cookies track visitors across websites and collect information to provide customized ads.

 Chris Ord is an internationally published wedding and fashion photographer from Newcastle, United Kingdom.
Website: www.chrisordphoto.co.uk
Instagram: https://www.instagram.com/chrisordphoto
Facebook: https://www.facebook.com/chrisordphotography
YouTube: https://www.youtube.com/chrisordphotography
What was the concept of the shoot?
One my of big beliefs as a photographer is that it is extremely important to shoot for yourself when you can. Yes, you must pay the bills by taking on commissions and jobs, but ultimately the reason I fell in love with photography was through the creative freedom you have to create pretty much anything you like.
I work with a phenomenal hair and makeup team at my studio on a monthly basis in order for us all to keep our creative juices flowing. We start with a few different concepts for shoots, scout the models and refine the idea using Pinterest so that we all have a good idea of what we’d like to create. The shoots always stay quite fluid because something can change at short notice and really change the look or concept of the shoot.
With this particular shoot, I was testing a new piece of equipment from my friends at Pixapro, the 90cm DeepPara box. After shooting a few larger editorial projects through the year for publication I wanted to get back to shooting a simpler one light set up, and create several different effects with that setup. I talked with my hair and makeup team about the concept and the general idea was to have black and white makeup and then add a splash of colour using powder paint towards the end of the shoot. As you’ll see from the images this idea changed as the shoot evolved and we created some interesting shots without moving the light, or the subject.
What setup and lighting did you use to get the shot?
Chris Ord is an internationally published wedding and fashion photographer from Newcastle, United Kingdom.
Website: www.chrisordphoto.co.uk
Instagram: https://www.instagram.com/chrisordphoto
Facebook: https://www.facebook.com/chrisordphotography
YouTube: https://www.youtube.com/chrisordphotography
What was the concept of the shoot?
One my of big beliefs as a photographer is that it is extremely important to shoot for yourself when you can. Yes, you must pay the bills by taking on commissions and jobs, but ultimately the reason I fell in love with photography was through the creative freedom you have to create pretty much anything you like.
I work with a phenomenal hair and makeup team at my studio on a monthly basis in order for us all to keep our creative juices flowing. We start with a few different concepts for shoots, scout the models and refine the idea using Pinterest so that we all have a good idea of what we’d like to create. The shoots always stay quite fluid because something can change at short notice and really change the look or concept of the shoot.
With this particular shoot, I was testing a new piece of equipment from my friends at Pixapro, the 90cm DeepPara box. After shooting a few larger editorial projects through the year for publication I wanted to get back to shooting a simpler one light set up, and create several different effects with that setup. I talked with my hair and makeup team about the concept and the general idea was to have black and white makeup and then add a splash of colour using powder paint towards the end of the shoot. As you’ll see from the images this idea changed as the shoot evolved and we created some interesting shots without moving the light, or the subject.
What setup and lighting did you use to get the shot?
 As mentioned above the modifier was the Pixapro 90cm DeepPara fitted with the grid to help control the light that little bit more, this was mounted on a Pixapro CITI600 strobe. I mounted the light above my head, I’m 6’5” so it was pretty high! I set up my camera on a tripod and tethered to my MacBook using the 5m Tether Tools TetherPro USB cable which helped me shoot a lot easier once the focus was locked in. This meant I could trigger the shutter from the screen without having to keep bending under the DeepPara.
Now, we essentially shot 3 different images with this one set up.
Shot 1 – Double Exposure
As mentioned above the modifier was the Pixapro 90cm DeepPara fitted with the grid to help control the light that little bit more, this was mounted on a Pixapro CITI600 strobe. I mounted the light above my head, I’m 6’5” so it was pretty high! I set up my camera on a tripod and tethered to my MacBook using the 5m Tether Tools TetherPro USB cable which helped me shoot a lot easier once the focus was locked in. This meant I could trigger the shutter from the screen without having to keep bending under the DeepPara.
Now, we essentially shot 3 different images with this one set up.
Shot 1 – Double Exposure
 For this first images, we wanted to create an ethereal feel, even ghost like along with the clown related makeup. There were two important elements with getting this right, getting two faces of the strobe at the right time, and having a high enough aperture to get both shots nice and sharp. This shot was taken at F22, with a 4 second exposure. The start of the shot triggered the first flash and I used an app called Colour screen on my iPhone and waved it in front of the lens for a second or so before triggering the second flash of the strobe manually with a second trigger to freeze the model, Alex, in the frame again. This took a good 10-15 shots to get right, and with the help of shooting tethered I turned the screen to our model so that she could see exactly what was going on and could plan he movement with a bit more ease. We used several different colours through the app to change the look quite drastically, but I preferred the red as it lent itself better to the cherry red backdrop.
Shot 2 – Paint
For this first images, we wanted to create an ethereal feel, even ghost like along with the clown related makeup. There were two important elements with getting this right, getting two faces of the strobe at the right time, and having a high enough aperture to get both shots nice and sharp. This shot was taken at F22, with a 4 second exposure. The start of the shot triggered the first flash and I used an app called Colour screen on my iPhone and waved it in front of the lens for a second or so before triggering the second flash of the strobe manually with a second trigger to freeze the model, Alex, in the frame again. This took a good 10-15 shots to get right, and with the help of shooting tethered I turned the screen to our model so that she could see exactly what was going on and could plan he movement with a bit more ease. We used several different colours through the app to change the look quite drastically, but I preferred the red as it lent itself better to the cherry red backdrop.
Shot 2 – Paint
 This shot was created pretty much by accident. I was lifting my aperture to F25 to allow more movement within the frame and shot a test frame off without triggering the second strobe flash. The shutter speed was still up at 4 seconds but because there was zero ambient light in the room there was no interference with the image at all. I loved the tone of this and how stark the paint was against the pale background. Shooting on a Canon 100mm Macro lens meant the level of detail was just incredible, and again shooting tethered meant that my Make Up Artist could see straight away on screen how the makeup looked and if we needed any touch ups.
Shoot 3 – Beauty
This shot was created pretty much by accident. I was lifting my aperture to F25 to allow more movement within the frame and shot a test frame off without triggering the second strobe flash. The shutter speed was still up at 4 seconds but because there was zero ambient light in the room there was no interference with the image at all. I loved the tone of this and how stark the paint was against the pale background. Shooting on a Canon 100mm Macro lens meant the level of detail was just incredible, and again shooting tethered meant that my Make Up Artist could see straight away on screen how the makeup looked and if we needed any touch ups.
Shoot 3 – Beauty
 For this shot we didn’t move the lighting at all, but changed our way of shooting. I wanted to get a nice shallow aperture look and lose the background colour too. This is when the Pixapro CITI600 really comes into its own utilizing its High-Speed Sync function.
So, keeping our lighting and camera position exactly the same, we brought Alex a step closer to the camera. My settings this time were F2.8 shooting at 1/1000sec. This gave me the perfect amount of focus in the face tailing off just around the cheekbones of Alex and fading into that deep black background (which was red!). This shot was to show off the excellent makeup skills of our artists and really show what this incredible light and modifier can achieve.
How did shooting tethered help you achieve the shot you wanted?
As mentioned above, particularly for the dual exposure element, it was a huge advantage for the model to be able to see the image, where she was in the frame and how it looked. This allowed her to pose and move a lot more confidently within the frame. Whenever I shoot with a creative team or on a commercial shoot, it’s really important to me to be able to shoot tethered to get immediate feedback from my team or the client. I’ve tried various tethering options from Camera manufacturers software to Eyefi cards but the TetherPro USB Cable has without a doubt been the quickest and easiest way to shoot in this way.
For this shot we didn’t move the lighting at all, but changed our way of shooting. I wanted to get a nice shallow aperture look and lose the background colour too. This is when the Pixapro CITI600 really comes into its own utilizing its High-Speed Sync function.
So, keeping our lighting and camera position exactly the same, we brought Alex a step closer to the camera. My settings this time were F2.8 shooting at 1/1000sec. This gave me the perfect amount of focus in the face tailing off just around the cheekbones of Alex and fading into that deep black background (which was red!). This shot was to show off the excellent makeup skills of our artists and really show what this incredible light and modifier can achieve.
How did shooting tethered help you achieve the shot you wanted?
As mentioned above, particularly for the dual exposure element, it was a huge advantage for the model to be able to see the image, where she was in the frame and how it looked. This allowed her to pose and move a lot more confidently within the frame. Whenever I shoot with a creative team or on a commercial shoot, it’s really important to me to be able to shoot tethered to get immediate feedback from my team or the client. I’ve tried various tethering options from Camera manufacturers software to Eyefi cards but the TetherPro USB Cable has without a doubt been the quickest and easiest way to shoot in this way.
 What type of post-processing was involved?
In terms of retouching, I’m a fan of quick and simple. I use a retouching plug in for PhotoShop to do basic retouching, but on this shoot it didn’t really warrant a lot. I used a couple of custom edits to create the finished look, slightly desaturating the frame and adding a touch of contrast.
What was the logistics and/or gear needed to achieve this shot?
I shot this at my studio in the North East of England and the set up was very simple.
What type of post-processing was involved?
In terms of retouching, I’m a fan of quick and simple. I use a retouching plug in for PhotoShop to do basic retouching, but on this shoot it didn’t really warrant a lot. I used a couple of custom edits to create the finished look, slightly desaturating the frame and adding a touch of contrast.
What was the logistics and/or gear needed to achieve this shot?
I shot this at my studio in the North East of England and the set up was very simple.