

The Concept
Sydney-based commercial photographer and Canon Master, Daniel Linnet was commissioned by Canon Australia to present a workshop, and provide “an unforgettable shoot experience”, for Canon resellers. Linnet was given an open brief and a small budget to work with, but the results certainly lead one to believe that big budgets and significant production values were involved. The aim of the workshop was to educate, inspire and entertain the participants, with each one having the opportunity to shoot on the set and control and direct all the elements within the lighting framework that Linnet set up.

The assignment gave Linnet the perfect opportunity to not only produce some powerful personal work, but also to collaborate with long-time friend, set and costume designer, James Browne. The two have worked on numerous projects over the years, resulting in a number of award-winning images. “James and I have been collaborating on our theatrical shoots for well over 10 years,” Linnet says. “It’s mainly personal work, often relying on recycled set elements no longer required for commercial shoots.”
Frequently, the items available for the sets help steer the image concept in one direction or another. Much of the inspiration for Linnet’s final image, Somnia, came from the famous 1948 image by Philippe Halsman, Dali Atomicus. “I find Halsman’s image both surreal, and real at the same time. There’s so much dynamic movement and energy which I was intent on capturing and portraying in my version,” Linnet says. It was the style and spontaneity of that image which initially drew Linnet to it as a basis for the workshop. But in order to be able to provide the participants with a great learning experience, Linnet first had to produce a series of his own images from which to base the studio experience around.

Post production and compositing was not an option given the time frame, and the fact that a final, completed image had to be printed later that day. Linnet had to capture everything in a single frame. “This is very much how James and I approach our projects,” Linnet says, “and I find that there is more of an organic feel to the image when it’s captured in one shot.”
Given his years of experience, Linnet was certainly within his comfort zone producing the images. However, for the studio workshop participants, with so many elements to control and keep track of, the shoot was definitely going to be a challenge.
For the workshop, participants were given the opportunity to shoot on the set, under the guidance and instruction of Linnet. Tethering played a crucial role in providing instant feedback to participants. It also allowed images to be printed quickly as RAW files were on the laptop almost as soon as they were shot.

Linnet’s final images were created in the hour before the first participants arrived and were created as a test of the lighting and the concept. While the set took a few hours to construct and erect, given Linnet’s experience with speedlites, setting up the lighting took a mere 30 minutes.
The Participants’ Challenge
For a professional photographer, managing multiple elements on-set comes with the territory, but for the participants, it would be one of the more challenging aspects of the experience. They would have to take control of all the different elements that a photographer typically needs to control during a shoot so as to get a feel for the creative process.
In order to produce their own images, participants had the option to:
- control the lighting, which they could do straight from the camera;
- adjust the quantity/brightness, direction and quality of the light;
- direct the model as well as wind and feathers to create the movement;
- adjust camera controls in manual mode;
- control lens selection/focal length which impacts the depth in the image; and
- try their own compositions.
Setting the Scene
The set was created to resemble a theatre stage. During the workshop, participants could control all elements and aspects of the shoot to help them arrive at their final image. Part of being able to produce strong images often relies on elements that one looking in doesn’t immediately take into account, and a great set along with the right model and creative team go a long way in producing the final result. The set was versatile, and the fact that it relied on reused objects and props from past theatre productions, all designed by Browne, greatly simplified that aspect of the production.

In order to amplify movement within the scene, the set was styled with objects designed to appears as though they were flying, caught in a gust of wind. All the furnishings and props were suspended by fishing wire from above the set. “I knew that most of it would be hidden by the lighting and texture of the background,” Linnet says. “And any that remained would give the shot a slight behind-the-scenes feel, which I was quite happy to have incorporated.”
We made the decision to work with an aerialist rather than a model as she would have the upper body strength needed to work within the constraints of the environment for the duration of the shoot. The choice of an aerialist also meant that the fundamental aspects of movement would be understood resulting in more dynamic poses.
Lighting and Gear
With the opportunity to use any of the 5 series cameras in the Canon range, Linnet opted for the Canon EOS-5Ds. “I chose the camera for its impressive 50-megapixel sensor, and the fact that the details in the files are outstanding,” he says. “I also like to have a smoother, less sharpened file straight out of the camera to handle in my post production, which often include sharpening or use of Tonal Contrast from the Nik Colour Effex PS Plugin.
Linnet is known as something of a master at lighting with small flash, and the results he produces lead many to believe that his images are created with extensive and expensive studio flash kits. For his series of images, he relied on just six speedlites, all of which were controlled by a Canon ST-E3-RT Speedlite Transmitter.

Although it wasn’t a prerequisite of the workshop for Canon, Linnet decided that he was going to light the whole shoot using off-camera speedlites. “I used the speedlites as I would normally use bigger studio lighting setups,” he says. “The idea was to demonstrate the ability of the small lights in turning what would normally be a complex lighting setup into a quick and simple setup with the flexibility to make adjustments whenever necessary.” The white set coupled with Linnet’s expert lighting meant that he was able to get two entirely different treatments in the final images from exactly the same lighting set up.
Small Lights – Big Results
Having worked with speedlites now for a number of years, to produce results that other photographers would rely on large studio flash setups, Linnet has been able to tailor, adjust and perfect his approach. “I always work with my lights in individual groups so I can control each light or group independently from the camera controller,” he says. To makes adjustment of lights quickly and easily, Linnet clearly labels each light stand with the lighting group letter for easy identification.
Controlling all the lights from one location, via the Canon ST-E3-RT Speedlite Transmitter, means that Linnet, or his assistant, isn’t required to walk around set manually adjusting each light individually. A successful final result relies heavily on the lighting being as close to perfect as possible. To this end, Linnet paid particular attention to the lighting ratios. ”I always start the ratio adjustment by testing each light individually after which I do the final tweaks with all the lights firing simultaneously.”
Lighting Setup
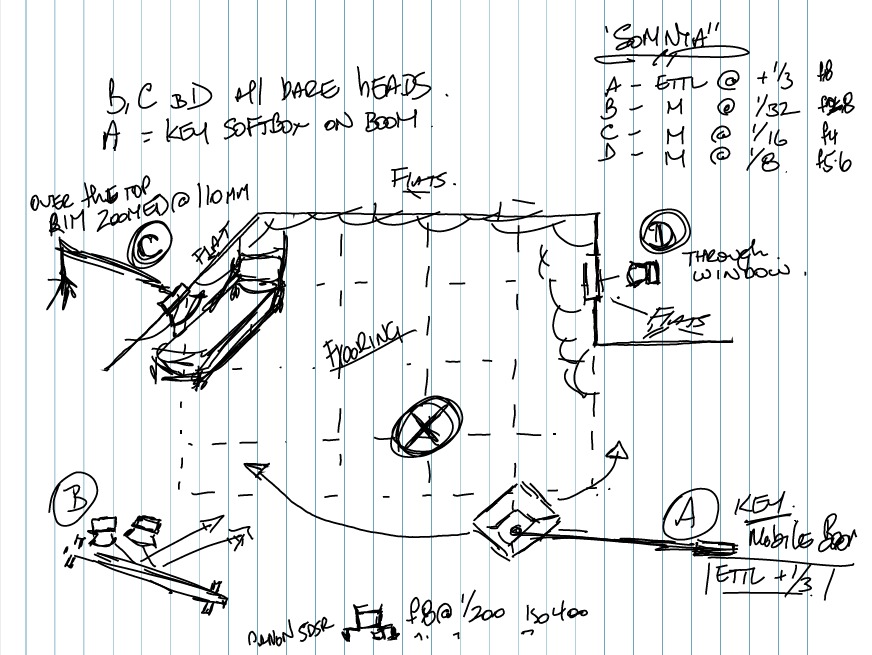
Linnet divided the six speedlites into four groups – each with a very specific purpose. For Group A, Linnet decided to opt for flexibility, so rather than have the key light on a fixed rig, the lights were controlled handheld on a boom. Two Speedlite 600EX-RT units were mounted in a medium square Lastolite Ezibox. This setup allowed the light to follow the model as she moved around the set. Linnet says that changing the lighting to match the aperture was simplified by using the STE-3 controller groups feature. And bringing the light as close as possible to the subject without being in shot gave him greater control over the spill.
Group B consisted of two speedlites that were bounced into a large white panel as room fill, set at minus two stops to the base exposure. The two lights were allocated in a single group which made it quick to adjust the power of both lights simultaneously. One of the lights were gelled a light blue, while the other a green so as to achieve the required colouring for the shot, and both had the wide-angle diffusers dropped down to achieve maximum light spread.
The third group, Group C was set up over the top of the flats and used as a rim light for extra separation on the model as well as illuminating the airborne feathers and atmospheric haze from very short bursts from a smoke machine. Linnet zoomed this light to 70mm to control the direction, and not flood the set with light. The final group, Group D was fired through a window-like opening to illuminate the mannequin and bed.
Benefits of Tethering
With the participants required to control so many variables during the workshop, Linnet wanted to give them a way of fine tuning the individual elements on the fly. The fact that cameras were tethered meant that participants, along with Linnet’s guidance, could very quickly assess their lighting and make any adjustments required, rather than having to rely on the tiny screen on the back of the camera to make critical lighting and exposure decisions. As well as this, tethering the RAW files straight into Lightroom meant that Linnet could print in high resolution immediately.

Post Production
Because of the time-constraints, practically no post production was involved. In most instances, the original image was output straight to a Canon PIXMA Pro-1 A2 printer.
The versatility of the white set provided Linnet with the option to vary lighting to achieve very different results. Through minor tweaks in lighting and post production adjustments in Lightroom, he was able to totally change the mood of the shots from low to high key and just a few simple steps.
The Kit for the Shoot
- Canon EOS-5Ds
- Speedlite 600EX-RT (6)
- Canon ST-E3-RT Speedlite Transmitter
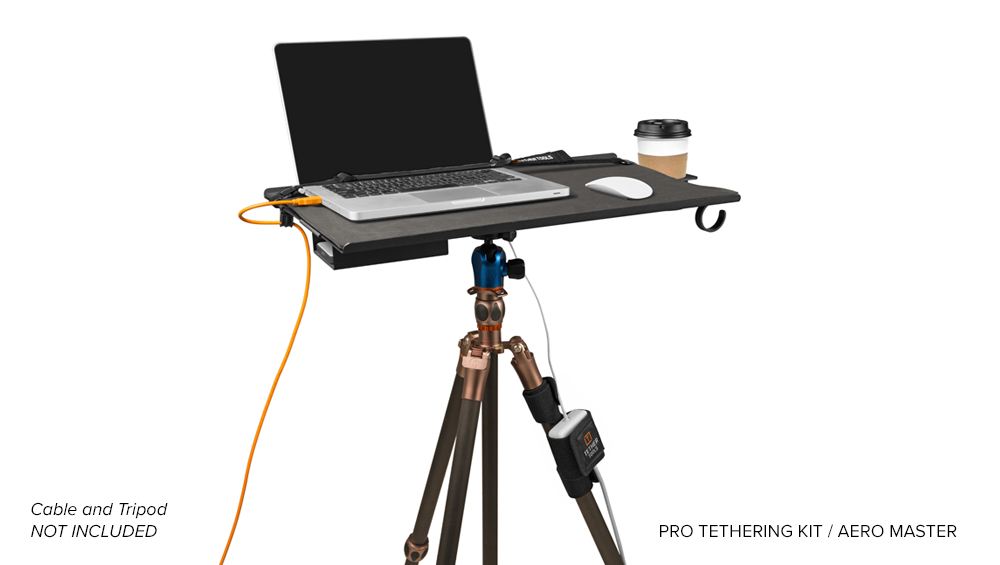
- Tether Tools Aero on stand
- USB Starter Tether Kit
- TetherBoost Core Controller
Daniel Linnet’s Top Five Lighting Tips
Get some direction
Mounting the speedlite on a simple lighting stand, tripod or c-stand enables the flexibility of directional placement. Direction can add extra contrast and drama to a scene. Experiment placing the flash behind the subject and firing it towards the subject. Known as rim lighting, it can be used to give the subject greater separation from the background by creating a highlighted outline around their shape.
E-TTL or Manual
Off the camera, your speedlite retains full E-TTL capability for fast, accurate on-the-fly flash exposures. This is great for shooting in rapidly changing lighting conditions or where constant location changes are required. For greater exposure consistency in more controlled lighting scenarios, try switching your speedlite to Manual power control and adjust up and down to match with lens aperture.
Imagine the sun
Whenever I use flash, I find it helps me predict what effect it will have on my image by visualising each speedlite as a portable sun, placed in the ideal position for my desired effect. Also, it definitely helps to get a good understanding of natural light before progressing to off-camera flash.
Zoom for control
The Speedlite 600EX-RT can be zoomed to 200mm which not only throws the light further, but makes the beam much narrower to create spot-light effects, or just kick out a selected object.
Observe your surroundings
Paying attention to interesting everyday lighting scenarios, even if I don’t have a camera at the time, helps me create interesting lighting in my images.
Shoot Credits
- Set & Costume Design: James Browne Presents ( he was the one behind the wind machine feeding the feathers in)
- Makeup: Mariel McClorey Mercury Makeup
- Model / Aerialist: Elisha Manik (Jeep Management)
- Photographers Assistant: Chris Corboy
- Wig by Clutching at Curls
- Big thanks to Art department Roo Briggs and Mashum Liberta as well as Emma Lian Goh for the complex rigging systems